Image Slider

Monthly Favourites: March 2011

March is also gone, and that means I'm a month closer to my final exams in June! That's the thought I woke up with this morning. I'm actually excited and panicked at the same time as I really want to graduate and get over and done with my Bachelor's degree and yet I still have a lot of material to cover! In fact, I'm staying in and study today as it is national holiday in Malta... Freedom Day. Anyways, here are my favourites for this month sugar pies :)


Maybelline Water Shine Lipstick in 02 Beige Glace & Primark Beauty light pink lipgloss has been my favourite lip combo for the past month. 

e.l.f. Everyday Brights 32 Piece Eyeshadow Collection

Face Candy Couture mineral eyeshadow samples. I have had these few quite a while but I only got round to using them this month for the first time and so far, I'm loving them!

NYX Concealer in a Jar in CJ12 Green. I have been looking for a green concealer for ages and now that I have found my perfect one, the search is over!

e.l.f. Studio Blusher in Candid Coral.  The perfect shade of blush that reminds me of summer!

e.l.f. Studio Make-up Mist & Set. My first ever make-up fixer and I love it!

NYX HD Studio Formula Foundation in HDF02 Soft Beige

What were your favourites this month ladies?

Missing In Action

Hello Lovlies,

I hope you`re all doing well :) This is just a little note to let you know I will be m.i.a for a little while as I have no internet connection at home. Infact my ever sweet Johan is listening to me dictate this post over the phone lol. Normal posting will resume as of this coming Friday.

Until then,

Stay beautiful.

Weekend Outfits and Make-up 26/03/11 & 27/03/11

Hey all! Thought I'd share what I wore yesterday night and what I'm wearing riht now as I'm typing this ;) I'm at my bf's right now after we went for a ride followed by a nice stroll in Bugibba.  The weather is absolutey lovely today and it looks like a nice summer evening so we took the opportunity to go out and enjoy the sunshine!

Let me start with what I wore yesterday:

Black long-sleeved top, Zara
Black cowl-neck top, Kenvelo
Red super skinny denim pants, Peacocks
Shoes, Dorothy Perkins
Studded belt, random shop
Bracelet, Thomas Sabo


I paired my outfit with a toned-down smokey eye look and subtle red lips as the denim pants have quite a striking colour.  Here's a list of all the products I used:

Face
Inglot Under Make-Up Base
Revlon ColorStay Foundation in 180 Sand Beige for Oily/Combination Skin
essence stay natural concealer in 01 Soft Beige
NYX Concealer in a Jar in CJ12 Green
Max Factor Creme Puff in 85 Light 'n' Gay
Rimmel Powder Blush in 004 Pink Rose

Eyes
e.l.f. Eyelid Primer
e.l.f. Duo Eyeshadow Cream in Black Licorice (gray shade)
shimmery gray (brow bone) mid-gray & charcoal black (lid) eyeshadows from e.l.f. Everyday Brights 32 Piece Eyeshadow Collection
e.l.f. Liquid Eyeliner in Black
e.l.f. Lengthening and Defining Mascara in Black

Lips
Vaseline
NYX Long Lip Pencil in Plush Red
Max Factor Lipstick in Hint of Red

...and today I'm wearing:

Coral slouch cardigan, New Look
White long sleeve top, Zara
Light beige denim pants, Stradivarius
Brown ankle boots, Tally Weijl
Tan cross-body bag, New Look
Charm necklace, Accessorize

With regards make-up, I decided to keep the look simple and natural looking. Here's what I used:

Face: e.l.f. Tinted Moisturizer in Rosy Beige
essence stay natural concealer in 01 Soft Beige
NYX Concealer in a Jar in CJ12 Green
e.l.f. Studio Blush in Candid Coral

Eyes: e.l.f. Eyelid Primer
e.l.f. All Over Color Stick in Persi
light beige eyeshadow from e.l.f. Everyday Brights Palette
e.l.f. Lengthening and Defining Mascara
Estee Lauder Eye Defining Pencil in Deep Brown

Lips: Vaseline
e.l.f. Mineral Lipstick in Rosy Tan
Napoleon Perdis Protege Lipgloss in coral

NOTW: Gingham and Flowers

This week's nail tutorial looks complicated when in fact, it is very easy to do!! I incorporated a three-petalled flower on my ring fingers and a gingham pattern on all the tips of my nails.  Here's what it looks like:


Like it? Read on for a step-by-step how to!

1. Start with a coat of clear base coat and leave to dry.

2. Apply two coats of a pink nail polish to the tips of all the nails, making sure you allow enough drying time between the applications.  I used an Italian pink by Eugene Perma.

3. Next, to start working on the gingham pattern, you will need a white striper polish and a gold one and proceed to make the lines as in the picture sequence shown below.  I used Golden Rose Paris Nail Lacquer no. 41 as my gold polish


4. For the flower, use a detailing brush to paint three little petals. I used Oil of Olay Nail Lacquer in 678 Bronze Reflection.

5. When the flower dries, it is time to add the details. Start by dotting a few dots in the centre of the flower where the petals join with the same gold polish you used for the gingham pattern.  Subsequently, proceed by making two lines coming from between the petals, one on each side of the middle petal with the white striper polish.  Finally, add a few dots with the pink nail polish near these white lines.

6. Seal your design with a coat of clear glossy top coat and you're done!


Small Peacocks Haul

Good afternoon every one! How's your weekend been so far? Mine has been quite busy with all the assignments I have to do as well as continue typing my dissertation.  Anyways, a couple hours ago I went to Peacocks with Mum as she wanted some cardigans and comfy shoes for work but unfortunately we found nothing.  Anyhow, we bought some other things and got a free beach towel as we spent way more than €50 between us (ouch says Mum's credit card lol) but it has already found it's way in the washing machine :P

This is all I got:


I loved the dress as soon as I set my eyes on it as it reminds me very much of my favourite fashion designer, Madmoiselle Chanel :) It was a bit big at the sides so Mum will fix it to fit me better.

The jeans are something I have been after for quite a while. I love this new trend of coloured denim but I was still looking for the perfect red pair... and today, the search ended!

That's all for today ladies :) Check back tomorrow for the nail art tutorial :)

Review: Avon Retractable Lip Brush

Hey guys! Here's a quick review for today as I'm a bit busy with assignments and my dissertation...

As you can tell from the title, I'm going to review the Avon Retractable Lip Brush which I've had for a while now.  I got mine from ebay and since I bought it from a seller in the UK, it only took 5 or 6 days to get here.  However, I cannot remember how much I paid for it but it wasn't expensive at all.

The brush comes with a little transparent plastic pocket that says 'AVON' and it looks really sleek and feels sturdy:


I bought this brush as I was looking for a good lip brush with a cap that I can carry with me to touch up my lips without worrying about the potential mess in my bag.

What I like about this brush apart from the size of it (both in terms of packaging as well the bristles, which are the perfect size) is the fact that it is retractable, therefore you really do not have to worry should the cap come off in your bag as you won't have lipstick smeared on the insides.  Having said that, I'm pretty sure the cap won't come off as it closes really tightly.  Anyhow, there's a little sphere at the base of the brush which is pushed by inserting the bottom part into the cap (as there is another little sphere in the cap) and in turn, the brush is revealed and ready for use!  Here are some pictures to show you what I mean:


The bottom of the bush and the inside of the cap


The actual brush bristles

I have used this brush multiple times and washed it and up till now, I have never experienced any shedding whatsoever and also, the bristles are easy to clean and get all the product off them in next to no time!

I definitely recommend this brush to anyone looking for a good, bag-friendly lip brush so if you ever come across it, just grab it!

Review: NYX Concealer in a Jar in CJ12 Green

Here's a review on a product I have only recently introduced to my make-up routine, the NYX Concealer in a Jar in CJ12 Green.

I bought mine on ebay for €5.18 and I think it was a good deal. It only took around a week and a half or so for the order to arrive and the jar was nicely packed in bubble wrap and the envelope was also marked as fragile so proper handling was ensured.  So much so, that the concealer arrived in one whole piece all the way from the US.

Let's have a look at the actual packaging of the product:


The concealer comes supplied in a small transparent glass jar that holds 7g of product and a black twist-off plastic cap.

You will need to find a good concealer brush to apply this product with as it doesn't come with one of its own.  The texture is really creamy and you do not have to tug at your skin to transfer the product as it glides on smoothly, enabling very good blending on your part.  I was actually very surprised at the creaminess of this concealer the first time I used it!

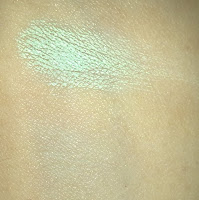
Why the odd colour choice you may ask? I was looking for some good coverage green concealer for ages to conceal and neutralize redness I get from occasional spots and blemishes.  Although in the picture above, it looks whitish, the actual colour is a very nice minty green.  Don't worry about your skin looking like Shrek's though as when blended, you can hardly tell where you have applied it! This concealer also carries a nice scent which I cannot really describe but I like sniffing at lol.  It does not linger on your skin though so it's nothing major.


Swatch of concealer: top, unblended; bottom, blended out

This concealer provides medium to high coverage and therefore does an excellent job at neutralizing the redness.  Despite being so creamy, I never had to touch-it up as it stays on for a good number of hours and does not crease at all.

The Concealer in a Jar range consists of 13 concealers out of which 9 are the usual skin-tinged shades to complement a variety of skin tones as well as the green one, a lavender one, a yellow one and the newly added orange shade.

I would recommend this concealer to anyone looking for a good coverage concealer to hide their blemishes as I'm sure they will be satisfied with the results as much as I am! 

You can get your NYX Concealer in a Jar from the NYX website, ebay or even check Cherry Culture :)

Review: e.l.f. Everyday Brights 32 Piece Eyeshadow Collection

Following the huge success of the limited edition 32 piece eyeshadow palette last holiday season, e.l.f. cosmetics have launched two new 32 piece eyeshadow collections earlier this month, namely, the Everyday Brights and Everyday Basics as part of their permanent essential line.  In this post, I'm going to review the Everyday Brights palette which I got for free as a replacement for a lost lipstick I had won (for those of you who are curious on the full story, please click here).

Let's look at the packaging of this palette first:


It comes in a nice, clean white box with a window showing the first three rows of eyeshadow and when you take it out of the box, you get this sleek, professional-looking palette that also feels very sturdy! The palette is conveniently sized so you can easily carry it with you when traveling.

On opening the palette, you are greeted with 32 different eyeshadows, some of which are quite unusual colours and they are all very bright, hence living up to the palette's name.  You also get a small dual ended eyeshadow applicator but I've never used it as it feels a bit coarse to the touch. A small mirror is located on the opening side of the palette as well.


So far, the ones I used are very nicely pigmented but you have to be careful when using them as due to their powdery texture, they tend to cause a lot of fall out so I suggest you build up the colour gradually or else some loose powder under your eyes which you can dust off easily when ready.  The colours are very easy to blend together and I'm always satisfied with the results.  Most of the colours are shimmery or contain some chunkier glitter but there is also a nice selection of matte shades as well :)

The use of a primer is always a must if you want your eyeshadows to last all the time while you're out and these eyeshadows really do last long enough for me! Here are some looks I have created with this palette so far and the eyeshadows I used:


Third row; # 2, 5 & 7


Fourth row; # 2 & 4 (red is FCC Dare)


Second row; # 4 & 5 (darker green in outer corner is FCC Leaves)


First row; # 2, 3 & 4
Second row; # 8

You can see they are all really pigmented, even the neutral brown ones, however, my favourite look is the first one as I love how the colours matched and how bright they turned out to be.  Which is your favourite look ladies?

You can get your Everyday Brights collection for €10 from the elf cosmetics website. Surely great value for money!!

Haul Time & little bit of sad news

Hey all! Today I went shopping with Mum for some clothes to wear on Easter Sunday as we do celebrate it big where I live. Not only did I end up purchasing half of the whole outfit, I also picked up a few other items which I will show you later on in this post.

But first, I would like to dedicate a little space to a true beauty icon that passed away earlier today... Ms. Elizabeth Taylor.  I was really saddened at the news and the least I could do to honor her is post a picture of her on my blog. May she rest in peace...


Elizabeth Taylor in her younger days... wasn't she beautiful? I wish women today were as elegant as the women in that era!!

On to what I got... So I bought most of my stuff from New Look so I think I will start with them:


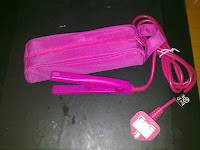
I love everything I got from there especially the pink mini hair straigtheners ^.^ even the plug is pink... how much cuter can you get?? The ring, I wore it as soon as I was out of the store as it happened to match my outfit.  I also got the bag as I had been lemming a tan cross-body bag for a while.  I also got two slouch cardigans and on my out I picked up two Blemish Muds from Montagne Jeunesse as I have loved it so much the last time I tried it.

This is the little jacket I picked up for Easter from Stradivarius:


I like the polka dot pattern on it and the cut is so vintage, reminds me of Audrey Hepburn and Twiggy! I will pick up a white skirt to go with it from Promod next Friday as they have to get it from another store for me. Fingers crossed it will fit me!

That's all for today ladies! Stay Beautiful!

Mid-Week Beauty Masterclass: Lip Products

Following last week's post, here are different lip products one can use to enhance the natural colour of the lips as well as changing altogether.  (Needless to say, never share lip products so as to avoid contracting infections or transmit them for that matter). Ranging from lipsticks to lip glosses, here is everything you need to know about them!

Lipstick is perhaps the most popular lip product around ranging from the most subtle neutral shades to the more striking colours.  Furthermore, you get different finishes like matte, shimmery and frost so you are bound to find what works for you.  Lipsticks are usually enriched with moisturizing ingredients so they come in creamy formulas usually.  However, you may still find that some of them may dry out your lips.  Nowadays there are formulas that claim to last and be kiss proof and all that but I have never met that kind of lipstick (till now at least) so it's great that they come in tubes small enough to carry in your bags for touch-ups!

Lip Gloss is a product that you either love or hate. Some people are put off by the fact that some glosses are sticky but you can counteract that by slapping on some lip balm before you put gloss on.  They are not very much pigmented usually and they come in various tubes with different applicators; the most common being, the doe foot applicator, the ones where you twist the base and apply the product with the little brush and the squeezy tubes.

Lip Stain is half-way between a gloss and a lipstick as it applies like a gloss but is as pigmented as a lipstick.  They do last longer than lipsticks though so they are worth a try. 

Lip Balm is an indispensable product that everyone should have as it is the moisturizer of your lips.  They come in a variety of formats which are all usually handy to carry around (except those that come in pots for me at least as I hate having to put my fingers into them so I always use a brush with them) and they are flavoured most of the time.

Plumping lip formulas is a general term I'm using here for all the lip products that claim to make your lips looking fuller and plumper. In reality these do nothing except increase the blood flow to your lips making them feel tingling and look fuller. You can achieve the same effect minus the tinging by putting on some lip balm/ Vaseline before going to bed and by morning you will have plump lips!

I hope you have enjoyed reading through this post and maybe leant something new! Stay tuned for more!