Image Slider

Showing posts with label NOTW. Show all posts

NOTW | Waterfall Manicure

This week, I chose a very summery colour for my nails and I tried a waterfall manicure for the first time. Basically, a waterfall manicure consists in painting different coloured lines in different lengths along the nail up to the middle to create a waterfall effect. Read on for the full tutorial!
 
 
1. Prep nails with a base coat and when dry follow with two coats of a bright red polish. I chose Essence Colour & Go in 115 Redvolution.
 
2. When thoroughly dry, begin drawing the 'waterfall' lines in colours that complement the base colour. I have used gold (Essence Colour & Go 140 Go Bold), orange (Essence Cute As Hell T.E. 02 Bad Girl) and a deep red (Essence Colour & Go 113 Do You Speak Love?). A fine detailing brush is best to carry out this part.
 
3. To add the flowers, use a small angled brush dipped in white polish (Sally Hansen Xtreme Wear 300 White On) and gently press onto the nail to form a five-petalled flower. Repeat to create another flower higher up.
 
4. Using a dotting tool, place a dot in the same bright red colour in the centre of the flower on the lines and using the dark red, repeat this step for the higher flower.
 
5. Seal with a top coat and you're done!


NOTW | Pastels and Gold

Good morning lovelies :) With Spring in full bloom, I have finally got the chance to wear pastel nail polish again. I went for some subtle sponging nail art on my ring fingers and I feel this manicure has a vintage feel to it. Read on to see how it easy it is to re-create!
 
 
1. Prep nails with a base coat and allow to dry.
 
2. Start painting your nails in the colour palette of your choice. I have used E.L.F. Lilac on my pinky and index, Essence Colour & Go 110 Modern Romance on my middle, Sally Hansen Xtreme Wear 300 White On on my ring fingers and China Glaze Midnight Kiss on my thumbs. Allow to dry completely and follow with a second coat.
 
3. Apply a little gold nail polish on a makeup sponge and gently dab it on the ring fingers. Repeat for as many times as you like to obtain the opacity you want. Repeat this step with the lilac and peach polishes in random places on the nail. The aim is to merge the colours together yet each of them would still be distinguished.
 
4. Once dry, apply a top coat to preserve your design.

 
P.S. I have submitted this manicure as part of a blog contest on the Julep website. Julep is a beauty company, well known for their nail polishes which I have heard a great deal of good things about. Too bad they don't deliver to Malta :( Anyway, if you are interested in checking out their selection, you can do so through this link here: http://www.julep.com/shop/nail-polish.html

NOTW | English Roses


With Valentine's Day coming up next week, I thought of sharing my first proposition for nail art ideas. I had this English Rose foil in my stash that I never used and thought it would be an original kind of nail art for Valentine's Day instead of the usual heart designs. Read on to learn how to apply nail foils and create an effortless and elegant masterpiece at your fingertips!
 
 
1. Prep nails with a base coat and follow with two coats of an opaque white nail polish. I have used Sally Hansen Xtreme Wear 300 White On and allowed approximately 5 minutes drying time between coats.
 
2. Leave the last coat to dry completely for at least 15 minutes, then working one nail at a time, apply a thin coat of foil adhesive and allow it to go tacky. This will take around 5 minutes per nail.
 
3. Cut a piece of foil a little larger than your nail and making sure it is the correct side down, apply it with gentle pressure on the nail. You may choose to use a q-tip for this step to ensure the design is transferred in whole.
 
4. Repeat for the rest of the nails and secure with a top coat.


NOTW | Floral Degrade'

Good afternoon lovelies :) Hope you're all having a fab Sunday funday :) Today I have a nail art tutorial for you! This one will look pretty on any nail length and of course you can adapt it with any colour combination you like. I have favoured acrylic paint for this tutorial because it is much easier to work with when you are doing intricate designs and all, plus it gives you plenty of time to create the design you want. Read on for the step-by-step guide to creating this ultra girly design!
 
 
1. Prep your nails with base coat and leave to dry. Apply a second coat for added protection if you are using a dark base polish.
 
2. Using a fan brush, dip half of it in an acrylic colour of your choice and the other half in the second colour. I have used an Italian pink shade and mixed some of it with white acrylic paint to obtain a lighter colour for a smooth transition. Using the fan brush to paint both colours on your nails will ensure a seamless application in one step. Repeat with a second coat when dry.
 
3. For the flowers, simply use black acrylic paint and a detailing brush and gently press the tip of the brush onto the nail to create flowers and different sized petals. Fill in any empty spaces with little dots. You can use a dotting tool for this step.
 
4. Add a centre to the flowers with a silver foil nail polish. I have used Orly Dazzle.
 
 
5. Paint the rest of the nails in a complimenting colour and leave to dry. Repeat with a second coat. I chose Essence Vampire's Love Trend Edition Nail Polish 03 True Love.
 
6. Seal everything with a glossy top coat. Don't forget to seal the edges for an even longer lasting manicure!


What do you think of this week's nail art? Upload pictures of your creations on my Facebook page if you try this nail art!

NOTW | Pink Flowers for the Birthday Girl

Hey all :) I am posting this week's nail art tutorial quite late because I was working all day today. So tomorrow is my birthday and I wanted a special manicure that totally agrees with my personality. I chose to have a deep French manicure (always elegant) and I opted for a combination of pink (very girly) and black (timeless and goes with everything). It took me some time to complete but in the end, the results were well worth it for I really like how it turned out and I got a lot of compliments for it.

 
Here is the step-by-step tutorial!
 
1. Prep nails with a base coat and proceed to apply a deep welled French tip with black polish. I used Orly Gel FX Liquid Vinyl so I had to cure it under UV light. The French tip should cover up to half of your nail tip.
 
2. When dry, apply a light pink polish to the clear part of the tip so that your French manicure looks like the ones in the photos. I used Orly Gel FX Catch The Bouquet.
 
3. Subsequently, apply an iridescent glitter polish over the pink part. I used Essence Colour and Go 105 Party Princess.
 
4. Define the pink-black borders with a pink crème polish such as China Glaze Second Hand Silk and apply a pink rhinestone in the spot where the borders intersect.
 
5. With the same pink crème polish, paint little flower petals around the rhinestone on the ring fingers on the black part only.
 
6. Apply top coat to seal in your design and you're done :)


NOTW | Aztec and Neon

This week I finally had the chance to try on some Aztec inspired nails and I wanted to use the neon stud rhinestones I recently got from Born Pretty Store as well so I incorporated both in this fun manicure. Read on for the tutorial and more pictures :)
 
1. Prep nails with a base coat and follow with two coats of a neutral polish. Used here is Essence Soul Sista Trend Edition Nail Polish 04 Totally Retro Nude. Allow to dry completely.
2. For the black stripes and Aztec patterns, I used black acrylic paint diluted with water to enable me to draw the intricate lines flawlessly. I used a size 0 Kolinsky brush as I find they give better results than synthetic hair brushes.
For the ring fingers, start by drawing two thin lines in a 'v' shape and then proceed to draw the Aztec stair-like design in small lines first and subsequently fill in. It helps to draw another 'v' shape a little further up to serve as an outline. Finish by painting a small triangle at the very tip as shown in the pictures and add neon rhinestones at the base of the nail.
 
3. For the middle fingers, you can use striping tape for more defined lines, otherwise you can just use a black nail polish straight from the brush and create a thick vertical stripe right up the middle of the nail. I used Essie Licorice for this step.
4. While the black polish is still wet, adhere square and round rhinestones to your liking and leave to dry.
5. Seal all the nails with top coat and you're done!


NOTW | Feather Manicure

I have finally jumped on the feather manicure bandwagon thanks to bornprettystore.com. I had bought a 5 feather pack off their website a couple months back and I have finally found the time to try them. I chose a natural colour to see how I liked the manicure and I am actually quite pleased with how it turned out to be. I used colour gels for this manicure so I had to prep my nails accordingly.
 
 
1. Prep your nails the usual way and apply two coats of a nail polish of your choice on the ring and middle fingers of both hands. I used Systeme Unique Colour Gel in Pewter.
 
2. Leave to dry (or in my case cure under UV light). Proceed by applying two coats of the same colour in a French tip fashion on the rest of your nails. Leave to dry (or cure).
 
3. Apply a third thin coat of the same colour on the ring and middle fingers. Do NOT cure.
 
4. Using a dotting tool, randomly place dots of another colour on the nails and using a small dotting tool, swirl the colours together to create a marbled effect. The contrasting colour I used is Systeme Unique Colour Gel in Metal Bronze. Cure under UV light and repeat for the other nails on the French tip area. If you are using nail polish, it is best to create the marbled effect one nail at a time.
 
5. Now for the feathers! Apply a coat of clear top coat on one of the ring fingers and snip off the tail of the feather you chose. Gently lower the feather on the still wet top coat, lick the ring finger of the opposite hand and apply gentle pressure to adhere the feather to your nail. Wait for a few seconds for the polish to dry and proceed by applying another layer of top coat over the feather. Here you want to make sure to apply top coat on the excess feather hanging over the free edge to make it easier to cut later on. Leave to dry.
 
6. Trim the excess feather off and file down any bits remaining closer to your nail. Finish off with a glossy top coat to complete your design. I used the Orly Gel FX Topcoat so I had to cure it and wipe off the tacky layer with the Orly Gel FX Cleanser.


And that's it! Anyone else tried the feather manicure?  

NOTD | La Ville Des Lumieres

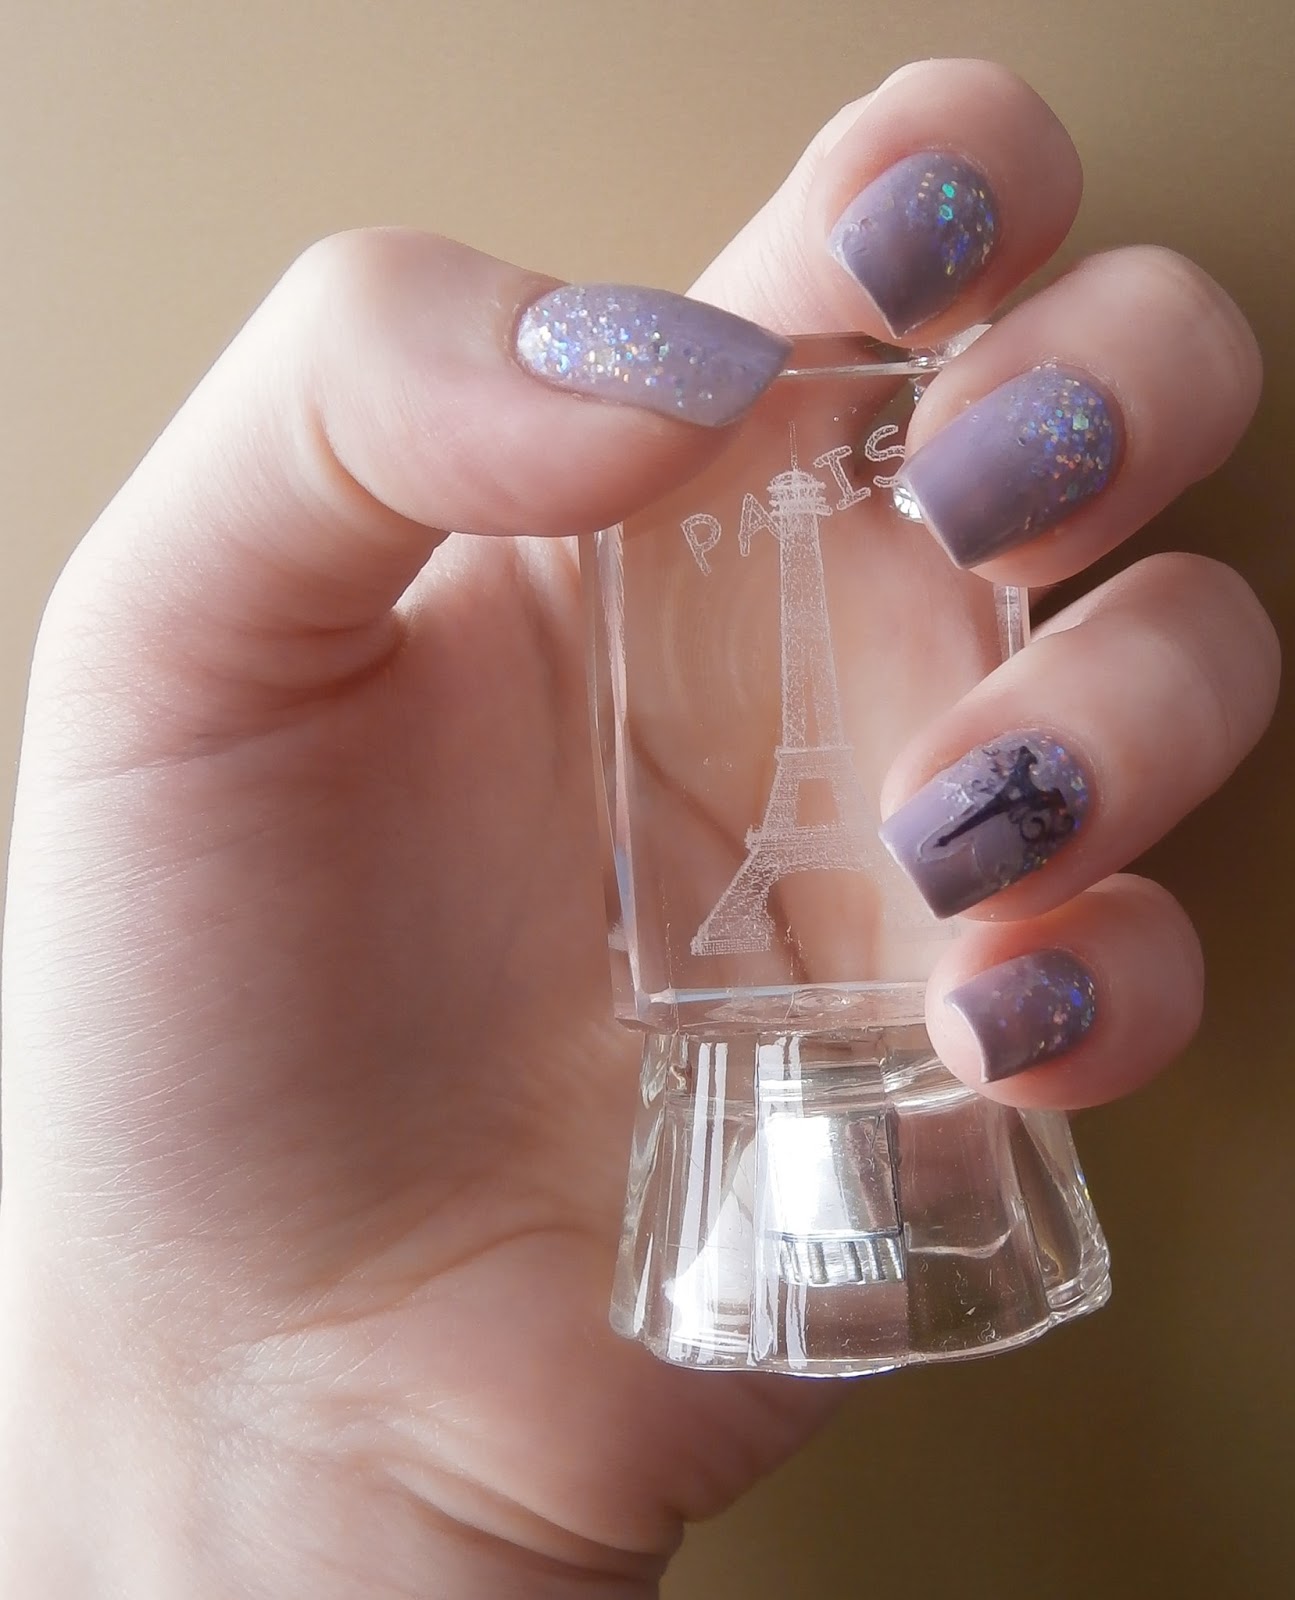
Good afternoon everyone :) This week I was looking through some pictures and I came across the ones from my last visit to Paris and since I have recently bought a pack of Eiffel Tower nail decals, I thought I should create some nail art with them.

When I think of Paris, a million adjectives cross my mind, especially the city's 'nickname' la ville des lumieres (city of lights) and I came up with this manicure. Read on to learn how to achieve the same look!
 

1. Apply a base coat to protect the nails.

2. Follow with two coats of a dark lilac polish. I used Essence Colour & Go 131 Ballerina's Charm.

3. When dry, apply a glitter polish such as China Glaze Snowglobe to the base of each nail. Start by dabbing the glitter onto the nail and gently drag it up towards the centre to achieve a gradient look. Allow to dry.

4. When dry, pick a sticker the size of your nail and affix it in the centre of the nail, a little above the base to give the illusion of lights behind the Eiffel Tower.

5. Seal with a top coat for a longer lasting manicure.


NOTW | Chevron Half-Moon Manicure

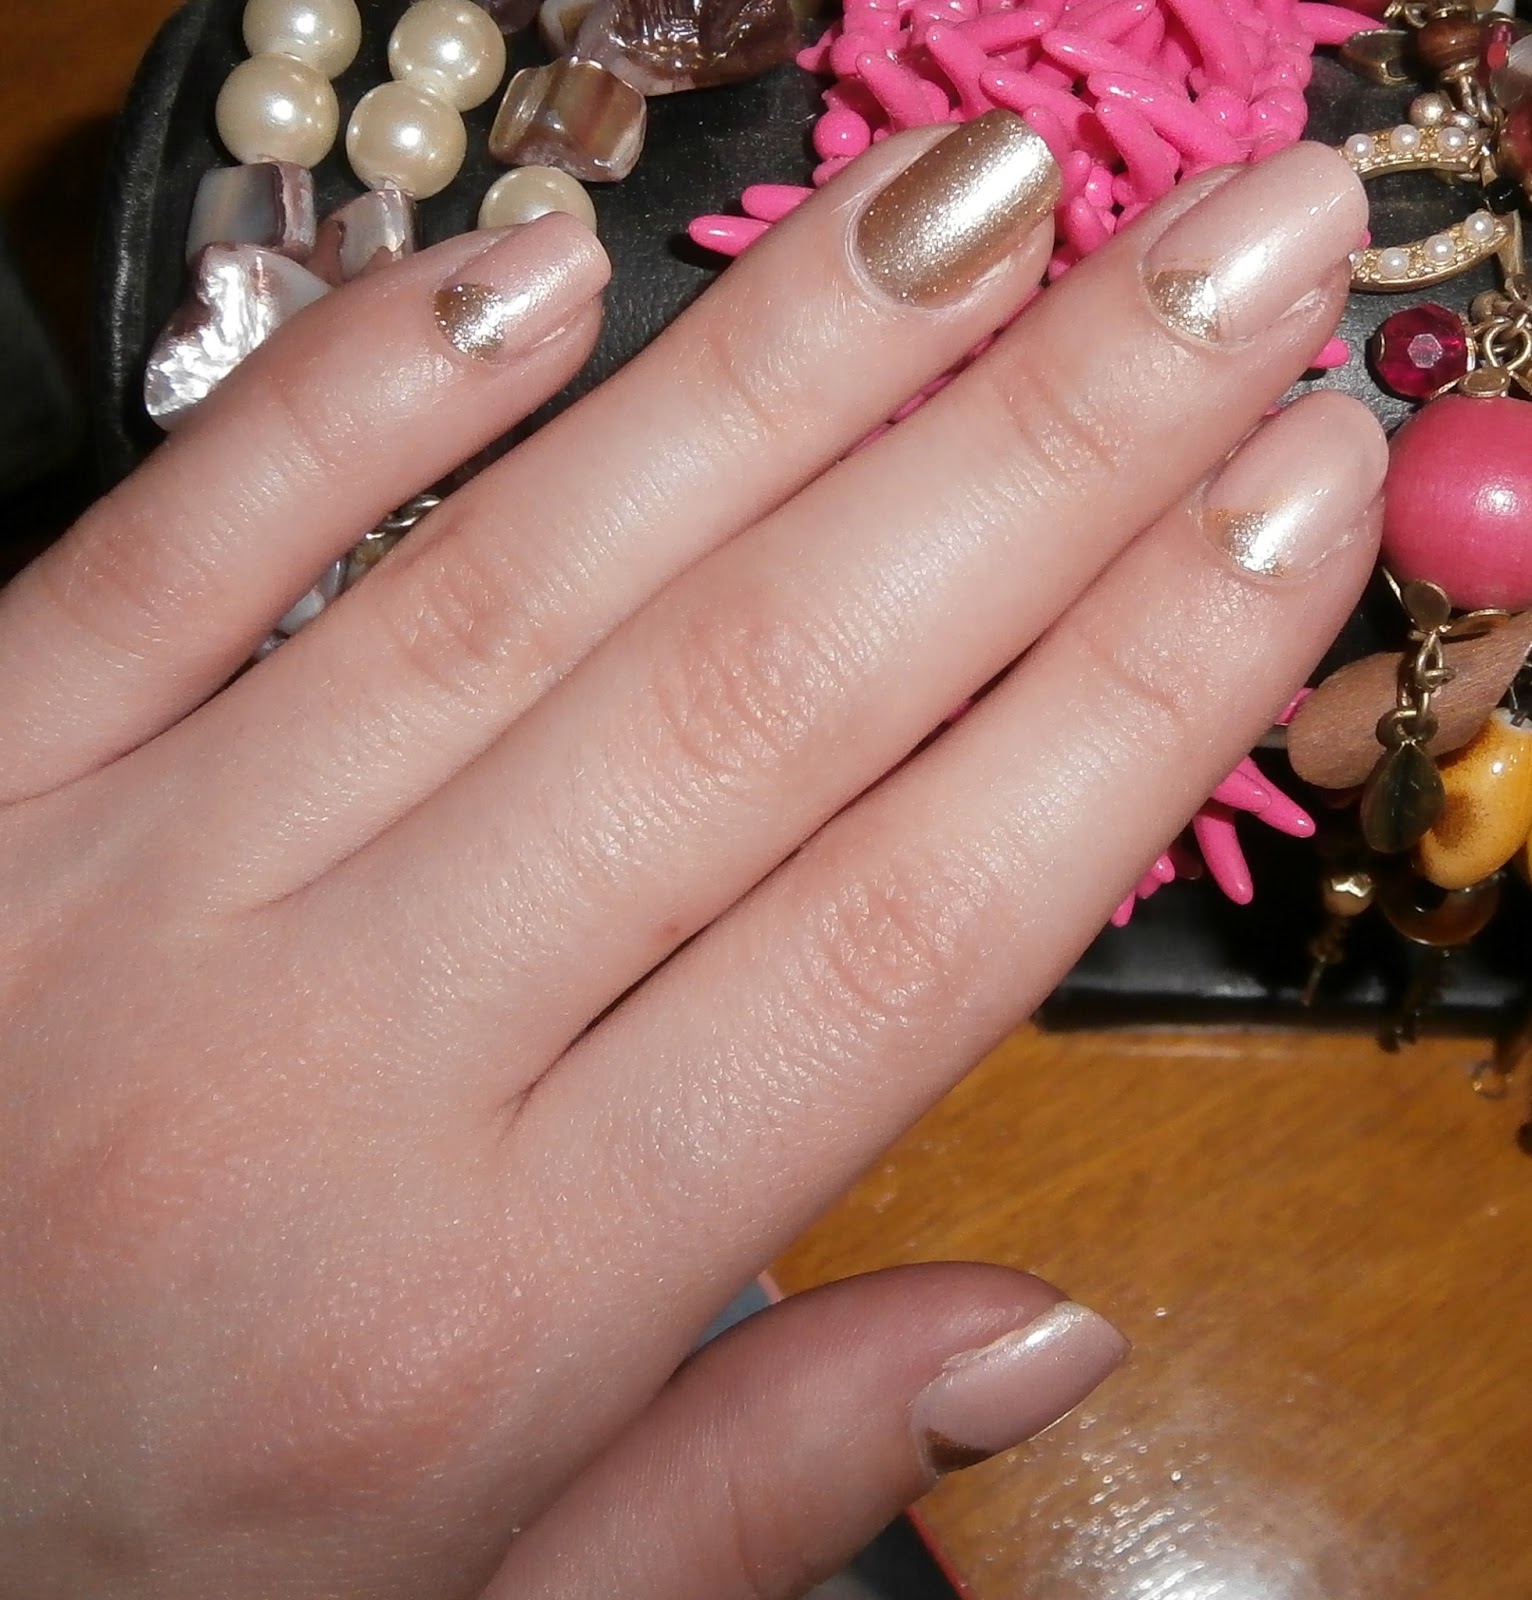
Hey all :) Hope your Sunday has been great! Here is the nail art tutorial for this week where I took a modern take on the half-moon manicure with a classic colour combination...nude pink and gold. Read on for the tutorial!


1. Prep nails with a base coat to protect your natural nails and help the polish last longer.
 
2. Paint two coats of a gold nail polish onto the ring fingers making sure to allow enough drying time for each coat. I used Essence Colour & Go 140 Go Bold. For the other nails, apply two coats of a nude pink polish. I used Essence Nude Glam 02 Iced Strawberry Cream. It is imperative to leave the nails to dry thoroughly before proceeding. 10 minutes should be enough.
 
3. Using striping tape, adhere two strips at the base of each of the pink coloured nails, forming a triangle and paint this triangle with the same gold polish used for the ring fingers. Wait for a couple of seconds and gently peel off the tape. Remember to take off the last piece of tape first.
 
4. Seal your design with a top coat and you're done!


NOTW | Blue & Green Watercolour Manicure

This is the nail art I have proposed for you this week...watercolour nails! It's very easy to do and of course you can choose your own colour combinations, the effect is simply beautiful! Read on for the tutorial!


1. Prep nails with a base coat and leave to dry.

2. Paint two coats of a white nail polish on the fingers you want to do the watercolour effect on and paint a French tip on the others. Here I used Sally Hansen Xtreme Wear 300 White On. Leave to dry thoroughly.

3. Seal the French manicured nails with a top coat and apply one coat of a fast drying top coat to the all white nails.

4. Pick the colours you will be using to create the watercolour effect with. I chose Catrice Cruise Couture Limited Edition Ultimate Nail Lacquer C04 Feel The Yacht Beat and E.L.F. Mint Crème. Put a couple of drops of each nail polish separately on a piece of aluminium foil and with a pointed or square tipped nail art brush dipped in nail polish remover, thin each colour out.

5. When satisfied with the colour, just touch the brush onto the white nail in random areas. Repeat for all the colours and when totally dry, seal with a top coat!


NOTW | Retro Dots

Retro dots is a nail art design that I have been meaning to do for a long time now and I have found the perfect colour combination to give the design a modern twist. Keep reading to learn how to re-create this nail art yourselves!
 
 
1. Apply a base coat to protect your natural nails.

 
2. Put on two coats of an orange nail polish. I used Sally Hansen Xtreme Wear 290 Crushed. Leave to dry thoroughly.
 
3. Select a few contrasting colours with which to paint your dots and use a medium and a small dotting tool to create dots down the middle of your nails. You can even put a contrasting colour dot into another one as shown in the pictures for a truly retro feel. The colours I chose are Catrice Ultimate Nail Lacquer 410 Pool Party At Night, Inglot Nail Enamel 309, China Glaze Lemon Fizz and China Glaze For Audrey.
 
4. When satisfied with the design, leave the dots to dry and seal with a top coat!


NOTW | Spring Blooms

The weather this week kept me in a spring mood and I opted for a floral manicure again. This time I tried the two accent nails look and I used three base colours.  Follow the simple steps to a little garden on your finger tips!


1. Prep nails with a base coat and leave to dry completely.
 
2. As base colours, I used Wjcon Nail Lacquer N.702 for the thumbs and index fingers, Essence Tip Painter for the middle and ring fingers and Essence Colour & Go 128 Let's Get Lost (mixed in a 1:2 ratio with the white nail polish) for the pinky fingers. Leave to dry thoroughly.
 
3. For the flowers, use a medium sized dotting tool to create 5 petalled flowers or 3 petalled flowers in the corners of the nails. Drag the centres of each petal toward the centre of the flower with a small dotting tool. For the flowers, I used China Glaze Lemon Fizz, Wjcon Nail Lacquer N.702 and Essence Colour & Go 128 Let's Get Lost.
 
4. Apply a dot of silver foil polish in the centre of each flower and leave to dry. Here, I used Orly Dazzle.
 
5. Seal everything with a top coat and you're done!