Image Slider

Showing posts with label teeth whitening. Show all posts

Teeth as White as Snow? Smile Lab Advanced Teeth Whitening Strips and Toothpaste Review

Teeth whitening is not a new concept for me. I have tried it in the past but I would always find myself lamenting from the same problem; even though the results are favourable, the teeth guard is too big and uncomfortable.

Thus, when I was approached to try the Smile Lab teeth whitening system, I looked the brand up at first to see what the kit consisted of and seeing that it contained strips, I decided to go for it. I'll start by showing you what the kit looks like.


Right off the bat, I love the pink and white packaging and sleek design! The kit I have comes with 14 strips and a sleek pink metal case to take the strips with you on the go, plus an instruction manual. Each teeth whitening strips sachet contains two strips, one for the upper teeth and one for the lower ones. In turn, each strip has a layer of gel spread onto it which contains all the whitening agents needed to achieve a million dollar smile. The gel is peroxide-free and is enamel safe.


Although it can feel tricky at first, the strips are actually very easy to apply and the instructions are easy to follow. The strips only cover the visible teeth, not all of them and you only have to wear them for 30 minutes, during which you can do some housework, get your hair or makeup ready or just relax! I'm happy to say the strips feel comfortable throughout wear time and the gel has a nice flavour.

Once the 30 minutes are up, all you have to do is just remove and dispose of the strips, brush your teeth with Smile Lab Whitening Toothpaste and enjoy your bright, pearly whites! The strips are not supposed to affect fillings or crowns but any discolouration on crowns or veneers will also be whitened. And after completing the 14-day program, the strips get a 10/10 from me! There is one thing though, I would have liked to have a colour chart so as to compare where I started and where I finished in terms of the teeth being whiter.


Now let's move on to the Advanced Teeth Whitening Toothpaste. Packaging comes in the same colour scheme as the strips and the toothpaste itself has a pink colour and a minty flavour. It lathers well so I'd say it does a good job at cleaning and keeping my teeth whiter for longer. It also features the breath control technology patented by Smile Lab to keep your breath feeling fresh for a longer time.


Now that you know I love the results and I have finally found my favourite teeth whitening kit, let's talk prices. I will tell you right away that SmileLab is the best value for money teeth whitening kit I have ever tried! The kit I have retails for €52.99 and the toothpaste retails for €10.49 for 75ml. There is also the Groom range for men which is available locally and a silver-coated toothbrush as well!

SmileLab is available at:
Roseberry (Valletta)
ValYou Supermarkets (Naxxar, Mellieha, Pendergardens St. Julian's)
Park Tower Supermarkets (St.Julian's, Santa Venera)
Health Junction Pharmacy (Zejtun)
De Paola Pharmacy (Paola)
Pisani Pharmacy (Gozo) 

PR Samples

Teeth Whitening at Home? HiSmile Teeth Whitening Kit Review

Those of you who know me, know how conscious I am of my teeth not being as white as I'd like them to be, hence the reason why I rarely expose them in photos. I had tried a teeth whitening session at a local med-aesthetic clinic a while back and while it did yield results, the process was a little uncomfortable for me and I have to say it is quite costly.

I am not one to lose heart easily, so, thousands of Facebook ads and loads of pictures on Instagram later, I decided to go ahead and try HiSmile. I went for the Teeth Whitening Kit which costs €54.99 and was delivered in less than 3 weeks.


Everything you need comes in a neat white box which has the HiSmile logo on the front, while information on contents and ingredients can be found at the back. The Teeth Whitening Kit consists of 3 HiSmile gels, 1 LED light with batteries, 1 mouth tray, 1 instruction manual and 1 results chart. First off, I really like how clean it looks and secondly, having the gel in a clear 'colour' somehow makes me think that there are not a lot of unnatural ingredients. In actual fact, if you look at the ingredients list, there are only 12 listed and they are all things which you can find in cosmetics and household items we use on a daily basis. Oh and HiSmile is vegan-friendly too!


The gel comes in syringes, each of which has a replaceable cap and holds enough gel for 2 uses thus the kit is good for 6 uses. The syringes are clearly marked in quarters for easy monitoring of how much product you're using. You will need a quarter for the top teeth and another quarter for the bottom teeth for any given treatment session.


Next, we have the LED light which requires 2 flat Lithium-Ion batteries (included in the kit) to function and a clear silicone mouth tray which attaches to the LED light. Everything is so easy to assemble and operate which makes this kit perfect for home use. The instructions are clearly explained in words and pictures.


Time for the fun part! I have been using HiSmile for the past 6 days of course to see if it actually works and if it lives up to the claim that it whitens teeth by up to 8 shades in less than a week. The LED light comes with a built-in timer for 10 minutes, during which you can practically do anything - chill, put away your laundry, read a magazine, watch a YouTube video...practically anything and when the time is up, your LED switches off and the device makes a beeping sound so you know you're done.


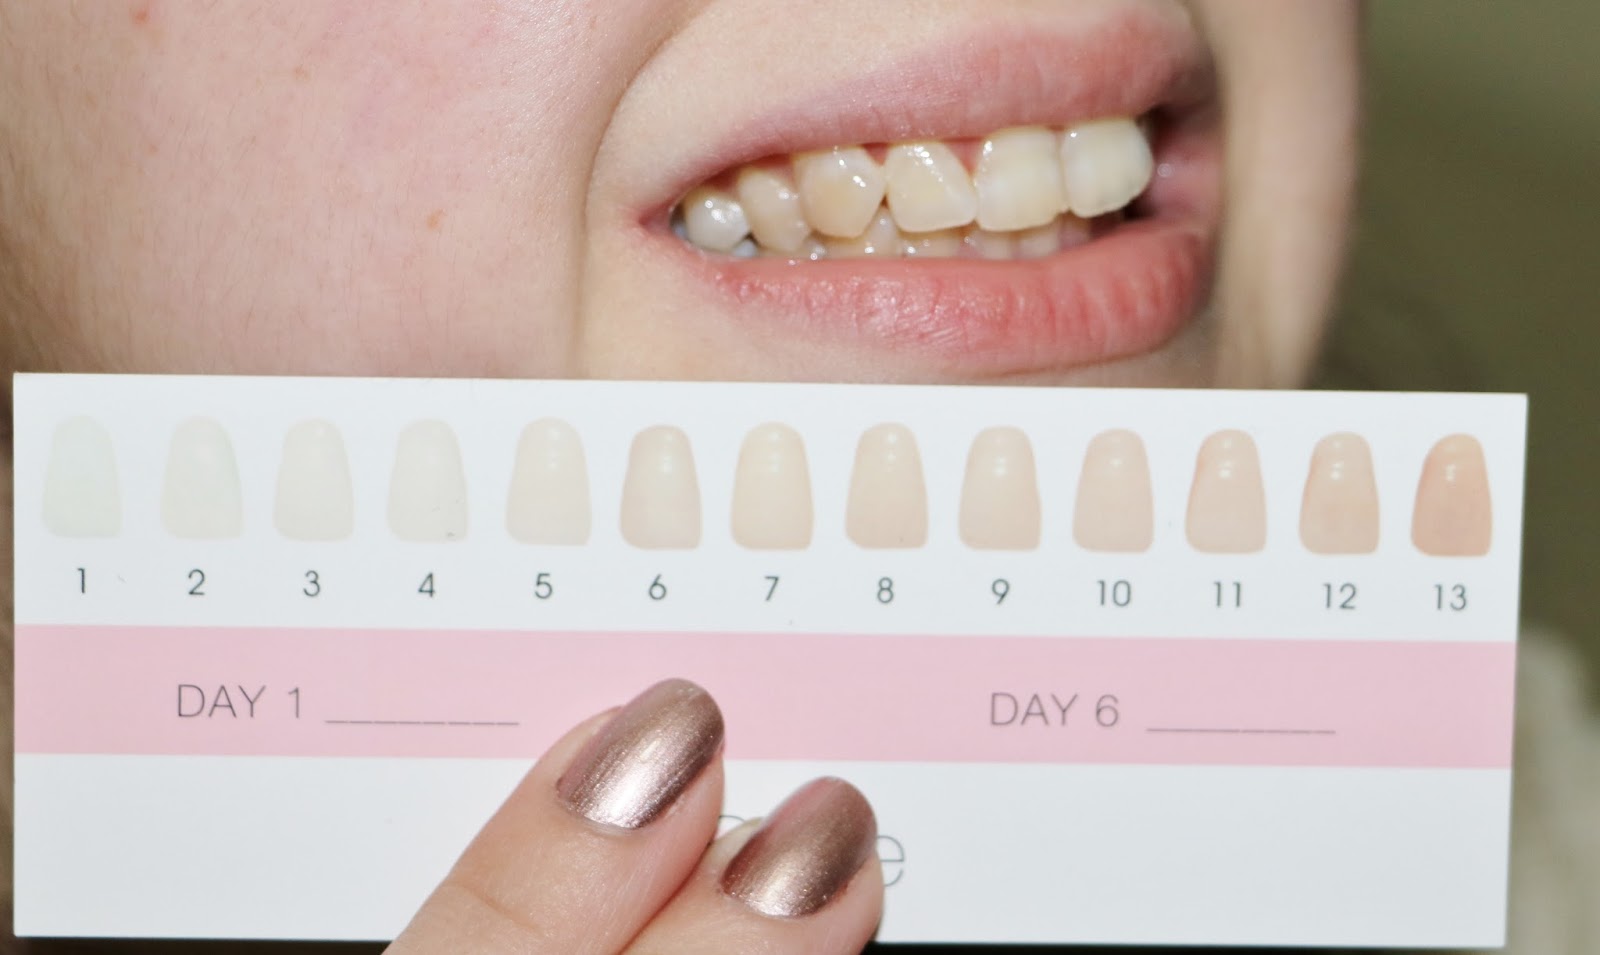
Here's what I do. I first check where my teeth stand against the colour chart, then apply the gel to the upper and lower faces of the mouth tray, pop the device in my mouth and push the 'on' button to switch the light on. It's is better if you apply gentle pressure on the mouth tray to make sure it really is up and against your teeth, thereby get maximum benefits. After the 10 minutes are up, I just rinse my teeth with warm water and see where they stand against the colour chart again. These are my results from the past 6 days.

Before starting HiSmile
My teeth stand somewhere between shade 5 & 6 on the chart

After the first try
My teeth are now closer to shade 5

Half way through at Day 3
My teeth are now between shades 4 and 5

Day 6
My teeth are now a solid shade 4

There was a difference in how white my teeth look after using HiSmile but it didn't go up the number of shades promised. Thus although this has worked and whitened my teeth, I think I would resort to having teeth whitening professionally done at my dentist as our wedding approaches next year. Having said that, HiSmile is still a great alternative for people with sensitive teeth as it whitens teeth without causing sensitivity reactions and it is designed for people with busy lifestyles who want to whiten their teeth as they go about their daily schedules.

What are your views on teeth whitening? Would you splurge on a professional treatment or do it at home at a fraction of the price?


PearlSmile Teeth Whitening at People & Skin Med-Aesthetic Clinic - Is it worth the hype?

Last Thursday I was quite excited to go to my appointment at People & Skin Med-Aesthetic Clinic in Sliema to have my teeth whitened with the PearlSmile system.

I was always conscious of the way my teeth look and they are the reason why I never, or very rarely show them in photos. I take good care of them but I always thought they are more on the yellow side than they should be for someone who has never smoked and doesn't drink coffee. When People & Skin offered me a treatment of my choice from the vast array of cosmetic treatments they offer, PearlSmile Teeth Whitening looked like the perfect opportunity to get whiter-looking teeth without going to the dentist!

About PearlSmile

PearlSmile is a German, cosmetic teeth whitening system which uses cold LED light to activate a 01.% peroxide gel to whiten teeth. It is a painless process that doesn't damage the tooth enamel or gums. The gel acts by neutralizing the pigment in the teeth, thus resulting in a whiter smile :)

Treatment

Fast forward a few days and I was on the doorstep of the clinic eagerly waiting to start the treatment! But, first things first. I was asked to fill out my details on a form prior to treatment and on which my teeth colour (according to the PearlSmile chart) was recorded before the commencement of treatment and after.


I was subsequently invited to the PearlSmile booth by my therapist who explained what the treatment entails and asked me if I wanted to go for the full 1 hour treatment (which is what I originally booked) or a 20 minute session. I could always opt to progress to another two 20 minute treatments for a full hour but I opted for the 20 minute session to see how it goes.


The first step is to clean the teeth using a PearlSmile wipe. This is a sort of finger wipe which tastes like toothpaste to prep the teeth. In the meantime, the therapist prepared a transparent silicone guard with the PearlSmile Gel and gave it to me to put over my teeth (side note - avoid any highly pigmented lipstick as it might get smudged). The timer on the cold LED equipment used to whiten teeth was initiated and I just sat back and relaxed in the super comfy booth!


Results & After-care

I must admit it wasn't the most comfortable of experiences when it comes to the silicone guard - it is a one size fits all kind of thing and I always have the same problem with such articles - they are too big for me so I had to be really careful to make sure it doesn't fall out. I think if the guard came in a smaller size, it would have been more comfortable for me so I am glad I went for the 20 minute treatment instead of a full hour.

When the timer was up, I was asked to remove the guard and after rinsing my mouth, we went on to see the difference. I went up from S14 to S12 so there was a one shade difference. Of course, the longer the treatment time, the whiter your teeth will get.


The difference is noticeable even with just one shade so I was quite happy to see it actually works. I might get further treatments in the future based on the fact that it works but not for now. It is advised to avoid foods which require some effort to chew for the first few hours after treatment as the gums would be a little sensitive. Having said that, I didn't experience any pain whatsoever. Also, red wine and coffee are best avoided following the treatment at least for a few hours.


To maintain whiter teeth, PearlSmile have the finger wipes and a powder 'toothpaste', both of which can be purchased by the customer as after care products. I went ahead and got a packet of wipes which retails for €10 for 24 wipes as they will come in handy when eating out.

If you're looking to have whiter teeth I would recommend the PearlSmile treatment and I would consider doing it again - I just wish the company would consider manufacturing smaller teeth guards for people with small jaws like me. A one hour session costs €145 while a 20 minute session costs €69.

I was wearing:
Pants - Purple
Earrings - Zara
Bag - Furla

Photography - Neil Psaila.

PearlSmile treatment was offered to me for free by People & Skin. All opinions are solely my own.