Image Slider

Showing posts with label corrective makeup. Show all posts

Review | Max Factor CC Colour Corrector in Yellow

A few weeks ago, the new CC Colour Correctors from Max Factor caught my eye in one of the brand's stands and seeing that I am always on a quest to find the best possible solution to cover up my dark under eye circles, I went ahead and bought the yellow one which is specifically meant to cover dark circles.


Max Factor CC Colour Corrector comes in a jumbo pencil format with a twist-up mechanism. While I do like the concept, I would have preferred if the product went all the way down into the tube so as not to nick it with the cap; but at the same time, this way you get more product so I'm not really sure why I wrote the first part...I guess it's the OCD part of my character that forced me to. One thing I do like about the packaging though is that there is the area the product is meant for printed on the front.


The formula of the product is very creamy and it effortlessly transfers onto the skin and blends in perfectly well. I like to combine it with a skin coloured concealer through as it would otherwise look too white. I always set mine with powder and I don't have any issues with it budging or fading or anything. I think it does a very good job at counteracting the blue tinge of said dark circles.


There are 4 more variations of this Colour Corrector, each targeting a specific problem so you are sure to have perfectly even skin every single time! So don't put up the white flag just yet if you still haven't found your perfect concealer and try this range first.

Max Factor CC Colour Corrector retails for €10.40 and can be purchased from authorised stockists. To keep up to date with product launches and competitions, don't forget to like the Max Factor Malta Facebook page.

Review | Wjcon Primer Corrective Anti-Redness

Today I will be reviewing another product I bought from Wjcon recently and as you can tell by the title of this post, the spotlight will be on their green Anti-Redness Corrective Primer.

First off, the primer is supplied in a black carton box that bears the ingredients and a swatch of the primer colour. The product information is printed on the back of the actual tube which is the same colour as the actual primer. The tube holds 30ml and it is very conveniently sized for travel. However, to see how much product is left, you have to put the tube against the light as it is opaque.

 
Here's a word about primers and their use in makeup... A primer is applied before foundation and after moisturizer to help create an even base and help your makeup last longer.  This one in particular also has a mattifying effect, counteracts wrinkles and being green, it contrasts any redness. I am still too young to have wrinkles so I cannot really comment on that but I can definitely give my two cents on this primer's other properties!

To begin with, I bought specifically the green corrective primer because I really liked the effect when Maria did my makeup at the Wjcon Bloggers' Night. I do get a little redness on my cheeks and from pimples so I thought this would be a great complement to my NYX Concealer In A Jar CJ12 Green.

What impresses me the most with this primer is that although it is green in colour, it goes onto the skin very sheer and it blends well effortlessly so that if you don't feel like applying foundation, you can skip it altogether and still look very natural.
 
 
The texture is creamy but a little on the watery side, hence very easy to blend into the skin. I use this primer when I am doing full face makeup mostly, because it helps keep the makeup on longer and my skin is kept oil free. The primer has no scent whatsoever and is rapidly absorbed into the skin. I haven't had any issues with breaking out while using the product.
 
To sum up, I would really recommend this primer to anyone whose skin tends to get red and acne prone people. It is available in another three varieties to suit everyone's individual needs; white to illuminate the face, purple to freshen up dull complexions, skin coloured to counteract pigmentation, dark spots and dark under eye circles.
 
Available from Wjcon in Naxxar Road, Birkirkara for €9.90 for 30ml. *Throughout the month of June, Wjcon are giving you a free nail polish with a purchase of €35 or more worth of products*.

Follow Wjcon Malta on Facebook for updates and special offers.
 

Mid-Week Beauty Masterclass: Corrective Make-up {Part IIIb - Eyes}

Good afternoon beauties! To catch up from last week's post, here are the rest of the eye shapes that are most commonly encountered and which are the best ways to apply make-up in order to portray them to their full advantage.

Deep Set Eyes: in this case, the eyes are deep set into the socket and therefore, the crease is not really naturally defined so we have to cater for that to make the eyes appear larger.
~ eyebrows have to be shaped in an arched fashion and always highlight this area to open up the eyes.
~ glittery/shimmery eyeshadow can be used all over the lid and create the crease with a dark eyeshadow. Take care to blend the crease eyeshadow and highlighter.
~ apply eyeliner to the outer corners and finish off with several coats of mascara.

Down-turned eyes: as you can see from the above picture, such an eye shape is characterized by a sad look imparted to the eyes due to the fact the eyes are lower at the outer corner than they are at the inner corner.  Thereby, the aim here is to 'lift' the outer corner.
~ have the brows shaped in an arch and highlight with a shimmery highlighter.
~ apply a pale eyeshadow to the inner 1/3 of the eye and on the rest of the lid, apply a darker eyeshadow.
~ apply mascara on the upper lashes only.

Narrow eyes: these are typified by a lot of space between the eyes themselves and the brows.
~ eyeshadow should be applied as follows: light in the center; medium shades in the inner corner and darker shades in the outer corner. Careful not to extend it more than the natural shape of the eyes.
~ apply a matte eyeshadow in the are between the brows and the eyes and highlight just under the arch of the brows.
~ use an eyelash curler to make the eyes appear wider and apply 3 - 4 coats of mascara.

Oriental eyes: these are basically the opposite of down-turned eyes shaped-wise.
~ make the crease appear more defined by using a medium coloured eyeshadow and apply a matte colour in the area over the crease to emphasize it and give the eyes a more rounded shape.
~ eyeliner is to be applied to the lower lash line and emphasize it with eyeshadow.  Finish with several coats of mascara on both upper and lower lashes.

So that's the end of the Corrective Make-Up Series ladies! Try out the different techniques discussed according to your own needs and let me know if they work for you!

Mid-Week Beauty Masterclass: Corrective Make-up {Part IIIa - Eyes}

After dealing with Corrective Make-up for face and nose shapes, this last installment deals with Corrective Make-up for the Eyes.   Like faces and noses, eyes come in different shapes and sizes. In fact there are a lot more! In this post, we will see 5 of the most common eye-shapes and next week, we will see the rest.  To make the most of your, apart from applying make-up to make the best of them, you also have to take care of the eyebrows (more information on how to care and shape your brows can be found here).

What shape are your eyes?

Close Set: when the eyes are close together, attention has to be drawn away from the centre of the eyes and therefore the following measures need to be done:
~ have excess brow hair removed over the bridge of the nose (this is best done by a professional).
~ avoid the use of glittery/strong coloured eyeshadows in the inner corners of the eyes.  Instead, use a matte eyeshadow and use dark eyeshadows on the outer corners as well as some highlighter.  Don't forget to use eyeliner and an eyebrow enhancer.  Here's a diagram to help you with eyeshadow application if you have close-set eyes (source):

Wide Set: as opposed to Close Set eyes, people with wide set eyes need to make them appear more closer together, therefore,
~ eyebrows can be drawn in closer by means of a brow pencil; however, take care not to go out beyond the inner corners of the eyes.
~ use a glitter/shimmer eyeshadow to enhance the inner corners and use a matte eyeshadow on the outer corners.
~ eyeliner can also be applied thinly in the inner corners for more definition.  The diagram on the left shows you how you can apply eyeshadow to make close-set eyes appear wider (source)


Also, here are more tips on how to apply mascara and eyeliner to wide-set & close-set eyes (source):


Round and Prominent: with this eye shape, one aims to make the eyes appear less rounded and therefore more elongated and wide.  For this reason,
~ round eyebrows are avoided, a slight curve would be more suited.
~ use a dark eyeshadow colour over the centre of the eyelid.
~ line your peepers just below the lower lashes from the centre towards the outer corner to elongate the eyes, taking care not to meet the upper lid.  You can also apply false individual lashes to the outer corners.

Protuding Eyes: for this eye shape, it is best to apply dark eyeshadows over the entire lid and highlight the brow bone.  An example would be a plum shade over the lid and a light pink to highlight.

Hooded Eyes: the aim here is to reduce the fullness of the skin that hangs on the outer sides of the eyes, therefore:
~ the eyebrows have to be shaped in such a way that they look like there is a slight lift at the outermost corner.
~ glittery eyeshadow or highlighter are best applied here to emphasize the lift as well as underneath the arch of the brow.
~ a dark eyeshadow has to be applied to the area where skin hangs and blend it well with the highlighter.

That's it for today ladies! Next week, we will see the rest of the eye shapes!

Mid-Week Beauty Masterclass: Corrective Make-up {Part II - Nose}

Hello my lovelies I hope you're all doing well :) Catching on from last week's post, today we will be having a look at different nose shapes and how to correct them to achieve that balance between facial features.  So let's have a look at the different nose shapes and what can be done to correct them with make-up:

1. Wide nose: apply shader to the sides to make it appear slimmer.  Alternatively, you can apply foundation that is darker than your skin colour to the sides of the nose. Start by applying it from the inner corners of the eyebrows and head downwards to the nostrils and cover the bridge of the nose with a lighter shade of foundation. Finish it off with applying transparent powder to the nose.

2. Long nose: apply shader to the tips and highlighter to the sides to give the illusion of a smaller nose.

3. Short nose: to add length to a short nose, highlight down the centre of the nose to the tip. 

4. Narrow nose: Apply concealer darker than skin color on the center of nose, and then cover the side of the nose with another concealer that is few shades lighter than the skin tone. Spread it with downward strokes towards nostrils to create width.

5. Naso-labial folds: are deep creases which run from the base of the nose (near the sides of the nostrils) down to the corners of the mouth and very prominent in heavy-smokers.  To diminish their appearance, simply, apply a lighter shade of foundation with a fine brush and blend carefully.

That's it for correcting nose shapes ladies! Stay tuned for next week's post regarding Corrective Make-up for eyes!

Mid-Week Beauty Masterclass: Corrective Make-up {Part I - Face}

Good morning cupcakes :) I hope this post finds you all in good health :)  Today, we shall be dealing with the different corrective make-up techniques that are best to minimize the attention on certain parts of our faces and emphasize our best features to the max.  Covering blemishes and disguising prominent features is also considered as corrective make-up.  I had already done a post about how you can correct the shape of your lips (which you can have a look at here) so today, I am going to discuss different face shapes and common flaws.  The next two posts with regards corrective make-up, will deal nose shapes and eye shapes respectively so look out for them :)

What shape is your face?


How many times have you been asked this question and you are not so sure about how to answer it?  I found this flowchart off the internet which seems quite helpful in determining what shape your face is and I have also included another picture which shows celebrity faces and their face shape is written underneath as I think seeing a 'real' face would help our understanding better on this subject.  Pull you hair back ladies, stand in front of a mirror and answer the questions on the flowchart to determine your face shape!


Next, identify any flaws you might have such as generalized skin redness (apply a green tinged concealer prior to applying foundation); sallow complexion (usually accompanies oily skin and is typical of Asian skin tones.  Use a purple tinted moisturizer/primer/concealer before applying your foundation); dark circles (use a lighter concealer to make the eyes appear brighter); puffy eyes (use a lighter shade of foundation in the crease under the puffy bag and a darker shade on the bags themselves to make them look smaller).

The most common face shapes are:

1. Round face: the cheeks are full and rounded so choose a darker shade of foundation than you normally would and apply it to the outer edges of the lower half of the face to achieve a slimmer face.  Apply highlight to the chin to give the impression of a longer face and balance it out.

2. Square face: faces with this shape, usually have a broad forehead and a squarish jaw-line.  Consequently shading the sides of the forehead and the jaw angles is essential to soften any harsh angles.  Highlighting the outer part of the cheekbones emphasizes the centre portion of the face.

3. Long face: shading the top half of the forehead as well as the chin is of utmost importance when dealing with a long face to make it look shorter.  Create some width by highlighting the cheeks.

4. Heart-shaped face: such a face shape is characterized by a wide forehead narrowing down to a point at the chin.  Thereby, width is needed at the cheeks and the jaw-line, which is easily achieved by applying blusher to the cheeks and highlighting the jaw angles.  Also, some shader may be applied to the chin.

What is your face shape ladies? How useful did you find this post? Liked it? Look out for the next two posts dealing with Corrective Make-Up!

Review: NYX Concealer in a Jar in CJ12 Green

Here's a review on a product I have only recently introduced to my make-up routine, the NYX Concealer in a Jar in CJ12 Green.

I bought mine on ebay for €5.18 and I think it was a good deal. It only took around a week and a half or so for the order to arrive and the jar was nicely packed in bubble wrap and the envelope was also marked as fragile so proper handling was ensured.  So much so, that the concealer arrived in one whole piece all the way from the US.

Let's have a look at the actual packaging of the product:


The concealer comes supplied in a small transparent glass jar that holds 7g of product and a black twist-off plastic cap.

You will need to find a good concealer brush to apply this product with as it doesn't come with one of its own.  The texture is really creamy and you do not have to tug at your skin to transfer the product as it glides on smoothly, enabling very good blending on your part.  I was actually very surprised at the creaminess of this concealer the first time I used it!

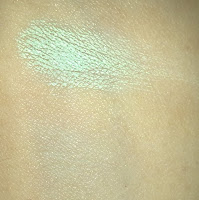
Why the odd colour choice you may ask? I was looking for some good coverage green concealer for ages to conceal and neutralize redness I get from occasional spots and blemishes.  Although in the picture above, it looks whitish, the actual colour is a very nice minty green.  Don't worry about your skin looking like Shrek's though as when blended, you can hardly tell where you have applied it! This concealer also carries a nice scent which I cannot really describe but I like sniffing at lol.  It does not linger on your skin though so it's nothing major.


Swatch of concealer: top, unblended; bottom, blended out

This concealer provides medium to high coverage and therefore does an excellent job at neutralizing the redness.  Despite being so creamy, I never had to touch-it up as it stays on for a good number of hours and does not crease at all.

The Concealer in a Jar range consists of 13 concealers out of which 9 are the usual skin-tinged shades to complement a variety of skin tones as well as the green one, a lavender one, a yellow one and the newly added orange shade.

I would recommend this concealer to anyone looking for a good coverage concealer to hide their blemishes as I'm sure they will be satisfied with the results as much as I am! 

You can get your NYX Concealer in a Jar from the NYX website, ebay or even check Cherry Culture :)