Image Slider

Review | E.L.F. Nail Polish Remover Pads

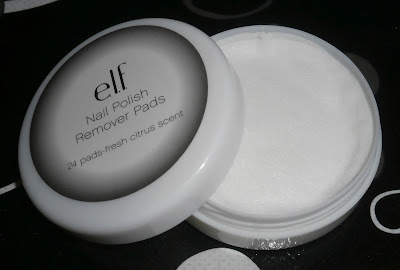
In my last order from E.L.F. Cosmetics, I had ordered a pack of Nail Polish Remover Pads to pop them in my bag whenever I don't have time to remove nail polish or if I have chipped a nail... which unfortunately is a common occurrence at work.

The packaging is nothing special really; just a round, white, plastic, screw-top box (5cm in diameter and contains 24 pads) with a label bearing the brand logo and product name. Additionally, the box comes packaged in a plastic sleeve and carton backing on which there are listed the product ingredients. The pads are acetone free, hence they won't dry your nails.


The pads are quite thin and carry a fresh, citrus scent; something far better than the usual nail polish remover smell. They are nicely loaded with polish remover and although it feels oily, it evaporates after some time from the skin and nails. 


I have tried these pads with light and dark-coloured polishes alike and I have to say I much prefer taking the light colours off with them as with the darker tones, an inevitable mess is in store.  I'd say you just need two pads for a light colour and 6 for a dark colour to take it all off so it's best to stick to the usual polish remover and cotton for the latter. As for glitter polish, just don't go there with these.

Having said that, I will definitely re-purchase these once I run out because they are very handy for emergency cases and I really like their scent.

Have you ever tried these? What's your take on them?  

The Exit Interview Series | Volume #17

This month's empties are mostly all new products that I have never used before. Read on to see which products will be ditched for good and which ones I will be re-purchasing.

Starting with hair care, I have finished up my L'Oreal Elnett Satin hair spray. I have really enjoyed using this product and the results are sooo worth it (pun intended). It smells good and has never left any tell-tale flakes on my hair while still maintaining hair in place. The price is somewhere in the middle...€7.25 for 250ml. I bought another one of these hair sprays but this time I opted for the one with the Pro-Keratin formula. 


I also gave a try to John Frieda Full Repair Shampoo & Conditioner this month. I have been able to use the samples for like 4 times and I really liked the results. My hair felt and looked healthy and I can safely say that these two products gave it a nice lift from all the heat-styling damage that I may have caused my hair. Once I finish my current shampoo and conditioner, I now just what I am going to buy!

Another new product which I finished is the Balance Me Pure Skin Cleanser. I got this a while back with an issue of Glamour magazine and because of it's small size, I packed it for my trip to Paris. It proved to be a good cleanser as it didn't irritate or break me out but I really wasn't a fan of the scent. Then again, it is a product of 98.8% natural origin so I can't complain. Too bad the range is not available in Malta :(

This D&P Perfumum deodorant was actually a gift and to be honest, I wouldn't consider re-purchasing. I didn't know what the scent was and I didn't really like it. That is all I have to say about it basically.


More empties...a sample of Essence by Narciso Rodriguez fragrance. I really enjoyed using this one; it's clean, fresh, floral and drifts me to better places instantly!


The Sally Hansen UV Top Coat came with a French Manicure Kit and I really liked it; however, as soon as you reach a little less than half the bottle it goes gloopy and is good for nothing as it won't dry, applies thick and no amount of polish thinner can restore it. No re-purchase there, sorry :(

All About Nail Art | Part 1 ~ Brushes & Tools

People have been painting their nails for centuries as a means to accessorize outfits and express themselves. Today is no exception and nail art has become a big part of the nail tech industry and new techniques are always being developed.

With all the different colours and tools available, it is no wonder that nail art has become a hobby for girls and women alike. However, whilst it is true that decals, glequins, fimo canes and a whole lot of other embellishments facilitate nail art, personally, I think that hand-painted nail art gives a sense of satisfaction like no other, both to the client and the nail technician. 

In this first post of this mini series, I will be going through the different brushes and tools you will need for hand-painted nail art.

Brushes

Brushes are technically the most used tools in nail artistry enabling us to create beautiful detailed work on such a small area as the nail.  You will need different brushes for different techniques but these are the most common brush types.

Detailing brushes are the brushes you are going to need most to create intricate work. If you are a professional nail artist, it is best to invest in some sable Kolinsky brushes rather than the ones that come with the cheaper sets from ebay. A size 0 and a size 1 brush are your best bet and you can find these on ebay, craft stores or artist shops. The Kolinsky brushes will be a bit more expensive because they are made out of natural hairs but they will last you a life-time. If on the other hand you have just begun experimenting with nail art, you can get a set off ebay for like €5 to start with, then upgrade as you go along. Make sure that your brush is not too thick, otherwise, you will not be able to create such intricate details (you can always cut your brush up to the size you want though).

Striping brushes are more adapted to create long, flawless, straight lines. Again, a striping brush made out of natural hair is better over one made out of synthetic hair as the latter ones tend to sort of bend little, hence there is no flexibility to produce a nice, fine line.


A fan brush is going to be your best friend when you want to apply glitter or when you want to clean up any nail art embellishments that didn't adhere to the nail polish underneath such as flocking powder and steel balls. You can also create beautiful gradient effects with a fan brush by painting on multiple colours at once.

Square tipped brushes and slant tipped brushes are most suited for what is known as ons stroke nail art where you use two colours to create life-like paintings on the nails, usually flowers. It is good to have a few different sizes and they don't need to be expensive. Just make sure they are stiff enough.


Tools

Dotting tools are great to create small and bigger dots alike to give nail art a more complete look. You can buy a set of like 5 double ended pieces from ebay or online nail art stores such as bornprettystore.com for a very cheap price.

Another useful tool to have is a pair of rhinestone tweezers to make it easier for you to pick up rhinestones and place them wherever you want on your nails.

Lastly, it's good to have a little tray where you can catch nail art embellishments that didn't stick to the polish to transfer them back to their pot.

Cleaning and Storage Care

In order for your tools to last and make sure they give you the best results each time, it is imperative that you clean them thoroughly with some nail polish remover after every use. Take care not to let the remover touch the ferrule as it may damage the glue inside and cause the bristles to shed.

Remember to store brushes with their protective caps on to maintain the bristle shape.  If brushes happen to lose their shape, just wet the brush with a little water and run it a few times over a bar of soap. Shape with your fingers and leave to dry.

Coming up in Part 2 ~ Nail Art Paints

Valentine's Day Nail Art Tutorial | Leopard Print & Hearts

Hey dolls :) It's been a busy few days for me so that's why I wasn't active much here. Anyway, here is a nail art tutorial for the manicure I will be wearing for Valentine's Day.


I chose leopard print frankly because it is sexy and while not everyone is keen wearing on leopard print clothing pieces, leopard nails are much easier to wear. As for the hearts, I think the reason is pretty obvious! Read on for the tutorial and more pictures!

1. Prep nails with a good base coat and leave to dry.

2. Paint on two coats of a nude beige nail polish such as Catrice Ultimate Nudes Nail Lacquer in Same Seine But Different on all the nails except the ring fingers. Leave to dry thoroughly. 

3. In the meantime, paint two coats of a sparkly gold glitter polish on the ring fingers. I chose Essence Colour & Go Nail Polish in Gold Fever which also has red glitter particles to make the hearts pop even more.

4. With a darker nude brown (E.L.F. Smoky Brown) and using the polish brush, place random dots on the top part of the nude coloured nails. Don't worry if they are not neat, as it will give more resemblance to actual leopard print. Leave out a small area so that you can paint a heart in the next step.

5. By means of a dotting tool and Essence Colour & Go Polish in Fame Fatal, draw a heart on each of the nails.  On the ring fingers, place it at the bottom of the nail, right in the centre as shown in the photographs, while on the other, paint the heart in the blank area. To draw a perfect heart shape, place two dots of red nail polish facing each other, then drag their centres downward and fill in the centre of the hearts.

6. Subsequently, go around the brown dots and hearts with black nail polish (Essie Licorice) and creat jagged 'C' shapes around them to finish off the leopard print.

7. Seal your design with a glossy top coat and you're done!


Enjoy Valentine's Day!

Review | Liptini Lip Liqueur Lip & Cheek Stain in 4013 Pink Lady

Lip stains are my current obsession lately and you can blame that on their excellent staying power and versatility. The latest addition to my collection is Liptini Lip Liqueur Lip & Cheek Stain 4013 Pink Lady and it comes courtesy of Meg's Make-up 250 points package that I received towards the end of last year.

The lip stain comes packaged in a small cardboard box that bears the company logo (I just love the little Martini glass and the brand's name!), ingredients and directions for use.  The stain itself comes in a cute little plastic tube with a matt silver screw-off cap and a standard doe foot applicator.  It has a jelly-like texture, smells yummy and has the most beautiful shade of burgundy-pink ever!


As the name suggests, the product can be used on both lips and cheeks but I prefer to use it as a lip stain for the simple reason that it looks too dark on my cheeks.  The applicator is my favourite when it comes to liquid lip products and I have no issues with it.

One application of Liptini Lip Liqueur in 4013 Pink Lady

I was surprised at how rapidly it dries as opposed to other lip stains I have which take considerably longer.  The colour is build-able and I like to use it both on its own and under similar coloured lipsticks/lipglosses as it helps colour last longer. In terms of lasting power of the stain when worn alone, I can safely say that it lasts until I take it off.  This brings me to another reason why I don't like using it as a cheek stain...it does it's job well at staining your fingers and takes some time to get off your cheeks!

Overall, this is hands down my favourite lip stain and I really would like to try more products from this brand! 

Liptini Lip Liqueurs retail at $18 each for 8ml of product. Check out the full range at www.liptini.com.

Product received for free after accumulating 250 make-up points on www.megsmakeup.com and redeeming them against a $15 shipping fee.