Image Slider

Showing posts with label glitter. Show all posts

Review | Born Pretty Store Chameleon Glitter

It's been a long time since I last showed my nails on this space but that's because I had some issues with broken nails and I really couldn't wait for them to grow back so that I can try this duochromatic fine glitter from Born Pretty Store.        


The glitter comes in a small pot (be careful each time you open it as you are bound to make a mess) and can be used both on nails and for make up as well as for crafts and decorative purposes. I decided to use it on my nails to spice up a nude nail polish and boy was I impressed with how it turned out!


All I did was apply the nail polish as usual and allowed the second coat to go tacky before I dipped the opposite index finger into the pot and gently dabbed the powder onto my nails. I thin sealed everything with a top coat to make it last longer. I wore this manicure for my first fashion week show as I think it looks very fashion forward!

Born Pretty Store offer a wide range of colours to choose from and each pot retails for $3.99. Remember you can knock 10% off the price with my code EBABK31. I think these would also look great mixed with some clear lip gloss to create stunning new lip colours as well as other nail art looks :)

 PR Sample

Review | Born Pretty Store White Hexagon Glitter 109

This week, I have another Born Pretty Store review featuring this white hexagon glitter jar. Of course, the first thing that comes to mind are wedding manicures but I have used mine in a pond manicure where I placed the glitters on the top layer.


I like how they change colour according to the light and since they are completely flat there is minimal risk of them falling off your nails - just make sure to seal them with a good top coat.


To use these glitters, I either pour some out on a small tray and pick them up with a dotting tool then transfer the rest back to the jar if I am going for a glitter placement manicure like the one shown here; or else, if I want the glitter all over my nail, I would just dip a wet finger nail in the jar and tap off any glitter that doesn't adhere to the nail.

Born Pretty Store offers other colours of glitters in different sizes to suit all nail art designs and this white one in particular retails for $1.96. Enter the code EBABK31 at checkout for 10% off your order.


PR Sample

Review | Born Pretty Store Mixed Glitter in #3 Ocean Mix

Lately I have been very much into glitter polish and nail decorations as they provide a quick and easy way to jazz up a manicure. My latest glitter nail art venture came courtesy of Born Pretty Store and this summery mix of green and blue glitter, dubbed as Ocean Mix.
 
The container is filled with a generous amount of glitter so you will have enough glitter for plenty of manicures. The glitter is very easy to use and I like the different sizes and colours which give the mix a gradient feel.
 
 
In fact, I have used it over a gradient manicure and all I did was simply shake the glitter from the pot onto my wet nails. I recommend placing a tray under your nails to catch the excess glitter and be able to reuse it.
 
 
A top coat is a must as the glitter feels a little gritty on the nails and be careful to avoid placing any of the large particles on the nail borders as they tend to nag on clothes and stuff.
 
Other than that, my manicure stayed pristine for a full five days and I got a lot of compliments on the glitter itself!
 
You can get this glitter mix from Born Pretty Store here with free shipping and 10% off if you use the code EBABK31 at checkout.

PR Sample

Event | Pupa Milano Christmas Collection & Novelties Preview

Last Wednesday was a very busy day as it saw me getting ready for my brother's graduation and an all-girly evening along with fellow bloggers and Stephanie from Medimports for the Pupa Princess collection and Pupa Christmas novelties preview at Sensations Wine Bar Birkirkara.
 
{image courtesy of Pupa Milano in Malta Facebook page}
 
Stephanie briefed us with a little information about the Pupa Milano brand and then we moved to Makeup Wonderland and were allowed to try out the products ourselves and even take some of them home to try.
 
For those who are new to Pupa Milano, the brand was founded some 40 years ago in the Italian Fashion Capital, Milan. Their first foray in the world of makeup were the innovative palettes and beauty coffrets which are still synonymous with the Pupa brand to date. The palettes make beautiful gifts and some people are known to collect them. Let's face it, they do make a beautiful collection!
 
Pupa has now evolved to a high quality makeup brand and they have extended their expertise to produce a full range of makeup accessible for every woman thanks to their affordable price tag. The pretty packaging of the palettes has not been compromised and is still reflected in every product they produce with an exquisite attention to detail that makes Pupa Milano products something to covet.

Pupa Milano are always in the lead when it comes to trends and they translate current fashion trends into makeup effortlessly and beautifully. They produce four collections a year, all of which evolve around a particular 'mood' as well as an average of 15 new products per year. Unlike the majority of brands, Pupa Milano make good use of limited edition collections where they introduce new products and if they are popular, they introduce them in their permanent collection.
 
The 'mood' for Pupa Princess Christmas 2013 Collection
{image courtesy of Pupa Milano in Malta Facebook page}
 
The brand divides its products in three ranges, all colour coded accordingly. Red stands for Passion, Black stands for Fashion and Pink stands for the Body Care range.
 
Let's have a look at Pupa Milano's propositions for this festive season! First up is the Pupa Princess Limited Edition Collection which is this year's Christmas collection. It revolves around a princess theme, as the name implies and the dominant colours are soft hues of nudes, pinks, mauves and mint. Some sparkle couldn't go amiss in a festive collection thus for glitter divas, Pupa Milano have included two Diamond Eyeliners, a shimmering loose powder and a Jewels Top Coat to complement the nail lacquer colours in the collection. They have also included a Fluffy Nail Art Kit in a beautiful shade of pink which complements all skin tones. Following the success of the Vamp! mascara, they have even created a Rouge Noir shade which I cannot wait to get my hands on! Full the full range of products and colours in the collection, check out their website here.
 
The Pupa Princess Collection in a beautiful presentation box
What I got to try from the Pupa Princess Collection
L to R: Lasting Color 634 Nude Rose | Diamond Eyeliner 001 Diamond Mauve
Fluffy Velvet Nail Art Kit 001 Fluffy Pink | Shiny Lip Fluid 001 Princess Nude
 
To continue with the glitter theme, Pupa Milano have introduced Party Queen to their Nail Art Mania range which features maxi glitter paillettes and a complementing Lasting Color Nail Polish in 6 beautiful tonalities. Each kit also comes with a brush to remove the excess paillettes and a plastic tray to collect the excess glitters in so as not to waste them. Here are three of the shades as modelled by Stephanie herself. Check out swatches of the full range here on their website.

Index: 006 Multicolor Party | Middle: 004 Fuchsia Party | Ring Finger: 001 Gold Party
On the pinky, Stephanie is wearing the Jewels Top Coat
from the Party Princess collection layered over her nail polish
 
Lastly, here are this year's Pupa Dolls which come in three different sizes to suit every budget. Nonetheless, any size would make a great gift and look good on any makeup lover's dressing table. The largest ones also feature an embossed front with actual fabric!

There are also the Pink 50's gift sets which smell absolutely amazing! Think Vanilla Milkshake, Marshmallow, Lollipop and Cotton Candy yummy scents!
 
To top it off, they come in the cutest gift boxes reminiscent of products you expect to find on a 1950's dressing table :) The other kits are the Have A Nice Tea Scented Water Kits, available in Blue Tea and Fruity Tea. 

Pupa Dolls, Pink 50's Gift Sets and Have A Nice Tea Kits
 
Above: Large & small Pupa Dolls
Below: Pink 50's Gift Sets
{both images courtesy of Pupa Milano in Malta Facebook page}

I cannot wait to try out the products I got and review them for you guys and I also have some new exciting products which I am only able to show you next year ;) Thank you Pupa Milano in Malta for such a fun evening!
 
For more information about Pupa Milano products and stockists, like their Facebook page here.
 
On a side note, if you haven't already, you should head down to Sensations Wine Bar for very good platters and drinks at even better prices!


NOTD | La Ville Des Lumieres

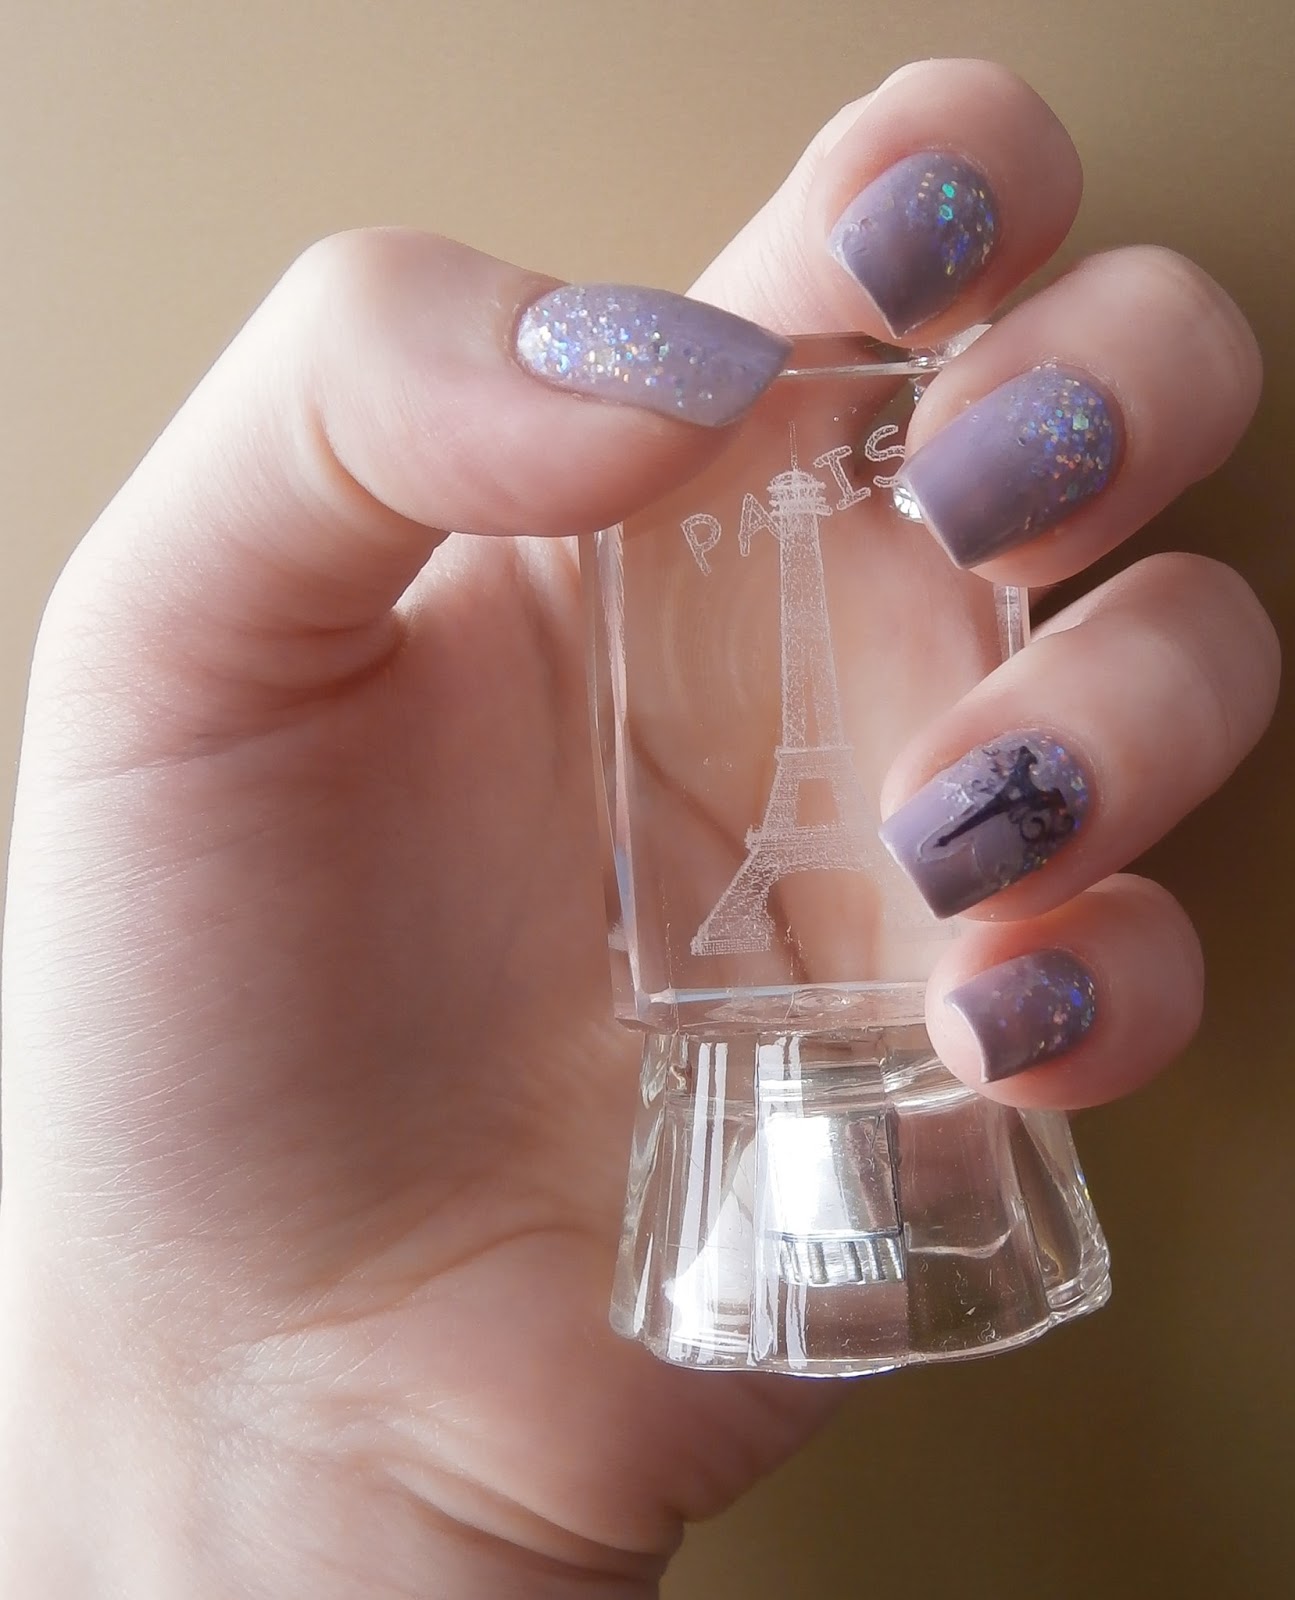
Good afternoon everyone :) This week I was looking through some pictures and I came across the ones from my last visit to Paris and since I have recently bought a pack of Eiffel Tower nail decals, I thought I should create some nail art with them.

When I think of Paris, a million adjectives cross my mind, especially the city's 'nickname' la ville des lumieres (city of lights) and I came up with this manicure. Read on to learn how to achieve the same look!
 

1. Apply a base coat to protect the nails.

2. Follow with two coats of a dark lilac polish. I used Essence Colour & Go 131 Ballerina's Charm.

3. When dry, apply a glitter polish such as China Glaze Snowglobe to the base of each nail. Start by dabbing the glitter onto the nail and gently drag it up towards the centre to achieve a gradient look. Allow to dry.

4. When dry, pick a sticker the size of your nail and affix it in the centre of the nail, a little above the base to give the illusion of lights behind the Eiffel Tower.

5. Seal with a top coat for a longer lasting manicure.


Valentine's Day Nail Art Tutorial | Leopard Print & Hearts

Hey dolls :) It's been a busy few days for me so that's why I wasn't active much here. Anyway, here is a nail art tutorial for the manicure I will be wearing for Valentine's Day.


I chose leopard print frankly because it is sexy and while not everyone is keen wearing on leopard print clothing pieces, leopard nails are much easier to wear. As for the hearts, I think the reason is pretty obvious! Read on for the tutorial and more pictures!

1. Prep nails with a good base coat and leave to dry.

2. Paint on two coats of a nude beige nail polish such as Catrice Ultimate Nudes Nail Lacquer in Same Seine But Different on all the nails except the ring fingers. Leave to dry thoroughly. 

3. In the meantime, paint two coats of a sparkly gold glitter polish on the ring fingers. I chose Essence Colour & Go Nail Polish in Gold Fever which also has red glitter particles to make the hearts pop even more.

4. With a darker nude brown (E.L.F. Smoky Brown) and using the polish brush, place random dots on the top part of the nude coloured nails. Don't worry if they are not neat, as it will give more resemblance to actual leopard print. Leave out a small area so that you can paint a heart in the next step.

5. By means of a dotting tool and Essence Colour & Go Polish in Fame Fatal, draw a heart on each of the nails.  On the ring fingers, place it at the bottom of the nail, right in the centre as shown in the photographs, while on the other, paint the heart in the blank area. To draw a perfect heart shape, place two dots of red nail polish facing each other, then drag their centres downward and fill in the centre of the hearts.

6. Subsequently, go around the brown dots and hearts with black nail polish (Essie Licorice) and creat jagged 'C' shapes around them to finish off the leopard print.

7. Seal your design with a glossy top coat and you're done!


Enjoy Valentine's Day!

Review: Born Pretty Store Striping Polish

Hello ladies :) I have another polish review for you today and this time, I will be reviewing this striping polish which Kevin from Born Pretty Store, has kindly sent me.  This is my first time reviewing nail polishes from Born Pretty Store so I was quite excited to receive the package.  In fact, I thought it was lost when 4 weeks had elapsed and there was no sign of it but it made it safely to my doorstep... better late than never!  However, here I have to mention that usually, packages from Born Pretty Store arrive within 2 - 3 weeks and shipping is free worldwide!  Moreover, the contents of the envelope were safely wrapped in a flexible jablo-like wrap and taped so no damage was incurred during shipping.  Furthermore, when I notified Kevin that the package could have been lost, he immediately agreed to send another one my way if it didn't turn up within the 4th week!

Back to the polish! Packaging-wise, the polish looks pretty much like most striping polishes and the bottle holds 10ml of sparkly polish (the one I chose is pink and you can find it here).  There are other colours from which to choose so you will definitely find something to suit your tastes! The brush is actually very nice to work with as it is a very good length to create stripes and other sorts of nail art and the handle is very ergonomic and provides a good grip.  I also like how the brush comes to a point as you can create pointy, defined lines easily.

The texture of the polish is more watery than a striper would normally be and I actually think this is a good point as it will last longer in the bottle and it will not thicken after only a few uses.  It does dry quickly on the nails though so that is definitely another plus!

Moreover, the glitter does not feel gritty especially after applying a top coat but as you would expect from any glitter polish, it can be a little of a pain to remove (on me, the polish lasted for a week until I took it off).

The pay-off with this striper is quite good in my opinion as you can see from the photos below where I created different designs with it and each time, I only applied one stroke of it!


The best thing about this striper polish is that it is available in different colours and formulations and retails for only $1.60 per bottle (the price goes down per bottle the more you buy)!

Here are some nail art designs in which I used this striper polish:


Have you ever tried any polishes from Born Pretty? If you would like to get some for yourself, go on and place an order and during this time, while they are celebrating their anniversary, new customers who register an account get 100 BPS points which you can use to save money! (there are more ways to earn these points, details about which can be found on the website itself).  Furthermore, if you would like 10% off your order, use the code EBABK31 until 31st December 2011 and if more than 20 orders cite the code, BPS will sponsor a giveaway for you all on this blog!

NOTW: Zip open some girly fun!... Valentine's Day Tutorial #3

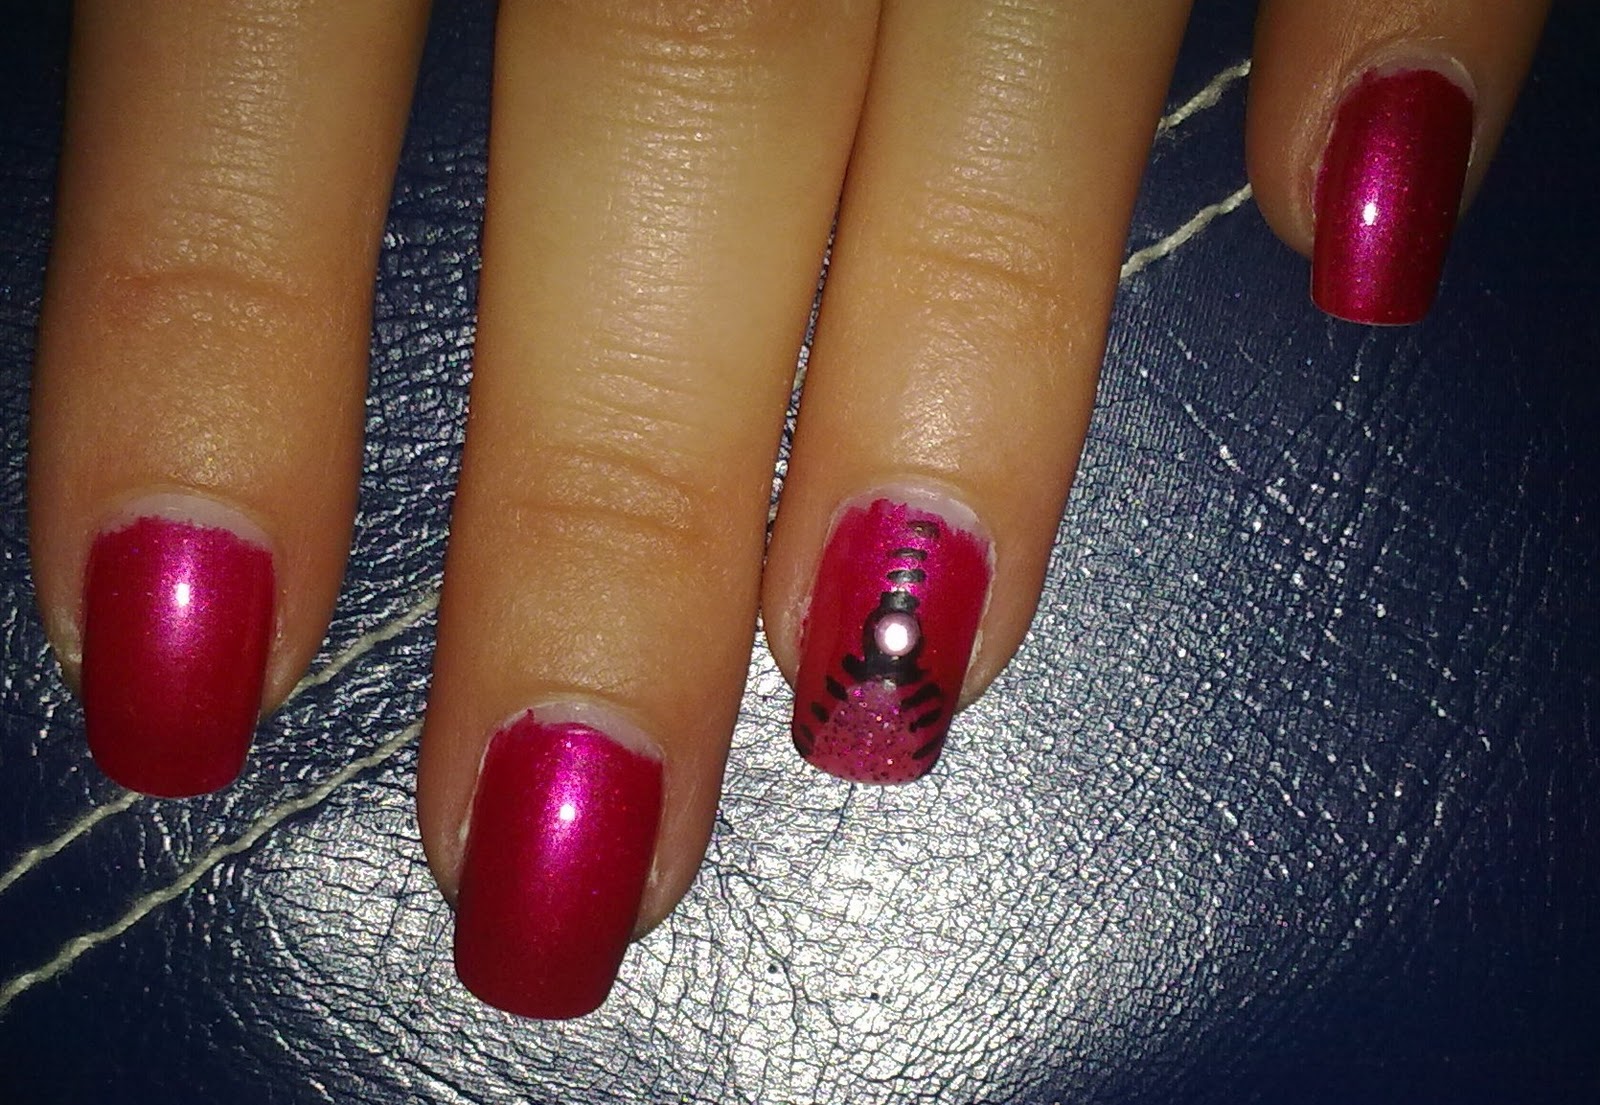
Good morning make-up cakes :) hope you've all bought your gifts for the Valentines in your lives and have everything planned for tomorrow :) However, Valentine's Day is not only for loved-up people so for those ladies out there who are single, I did the last Valentine manicure with you in mind :) I know some of my girly friends who are single and go out together on Valentine's Day for some girly fun without boys and I thought I would steer away from hearts and roses and go for something fun! And what better way is there to represent fun on your nails than by wearing glitter? So let's get started on this fun manicure!

1. Prep your nails with a clear base coat and follow with a thin coat of a nude pink polish to prevent your nails from being stained with the darker pink polish.

2. Apply two coats of a nice bright pink polish on all your nails bar the ring fingers and any other nails you want to make the design on.  If you are going to do the design on all your nails, skip this step altogether.


3. For the design, you will need the same pink you used on the other nails, a glittery pink and a black striper polish.

a) Start by drawing a little upside down triangle at the tip of the nail with the glitter polish and leave to dry.
b) Paint the remaining areas of the nail on the sides of the triangle with the bright pink polish and leave to dry thoroughly.
c) To draw the zips, start from the tip of the triangle that is facing downwards and draw little horizontal strokes with the black polish, working your way down the length of the nail.  Do the same on the sides of the triangle to make it look as if you are opening up the zip!
d) Finally, draw a little circle just under the tip of the triangle and place a pink rhinestone in the middle to resemble the actual zipper.

4. Finish with a clear top coat and you're done!


I hope you liked this nail design idea and that you will try it out yourselves! If you do, please do link me to your photos as I love to see your work :) Have fun tomorrow and Happy Valentine's Day to all!

Blogger Templates
Blogger Templates

Review: e.l.f. Liquid Eyeliner in Stardust

Every girl needs a touch of glitter in her life. Fact. Therefore, today I am going to review something with lots of glitter, namely e.l.f. Liquid Eyeliner in Stardust.

When you receive it, it will be contained in the usual blister pack, typical of elf's regular line; when you open it, it looks like nothing you wouldn't expect a liquid eyeliner to look like: long, slender black handle and small container (this one in particular holds 5ml).

Too start off with it, I always like it when products have a long handle as it enables you to control application.  I also like the hard tip on this eyeliner which makes the application precise all along the lid without tugging and prevent the product from going all over the place due to straggly hairs in the applicator.  However, as with all other products that contain glitter, it is very difficult to get an even distribution with one go, so I suggest going for two coats.


Furthermore, it is better to allow a couple of minutes for the first coat to dry before applying the next one. I have to admit this takes a bit long to dry so yeah do devote like 2 minutes for it to dry before proceeding with  the rest of your make up or else apply it as the last thing. However, once it is dry, it stays put forever until you take it off, so that's definitely a plus! The glitter particles will feel a bit harsh to the touch but they never irritated my eyes, not even whilst removing the product. I really like iridescent glitter as it changes colour according to the angle it picks up the light... perfect for party season which will soon be upon us or as a sparkly stocking-filler!

This eyeliner retails for £1.50/€1.70 from the elf website and is part of a range of 9 shades.

Blogger Templates
Blogger Templates

NOTW: All that glitters...

... is not necessarily gold! But in this case it is! For this week, I created an Autumn-inspired manicure with of course Autumn colours, and let's face it... who doesn't have gold come to mind when someone says Autumn? Leaves are also something we seem to connect to Autumn automatically as it is during this time that they change to beautiful golden brown shades and shed from the trees. I incorporated these two elements in this manicure which may be a bit time consuming, but in my opinion is really worth trying.

Here are the step by step instructions how you can do it yourself!


1. Start off with a clear base coat (Florelle Nail Strengthener)

2. Apply two coats of a gold nail polish of your choice. I particularly like a coppery gold, so I opted for elf Cosmetics Nail Polish in Blush. It is better to apply two thin coats rather a thick one for a smoother finish. Remember to let coats dry thoroughly in between applications.


3. Apply one or two coats of a sparkly gold glitter polish depending on how much glitter you want.

4. Now, for the leaf design. I used elf Cosmetics Nail Polish in Chocolate to create the basic design starting by drawing the middle vein of the leaf all across the nail by means of a detailing nail art brush. I chose to draw mine diagonally to make it look more life-like. Then proceed to draw the leaf body and small veins on the inside. You can draw which ever kind of leaf you want, but since I am not a very good artist, I opted for a simple leaf on each of my ring fingers.

5. To add a bit of playfulness to the design, draw tiny swirls with the same brown polish or a bronze polish to suit your taste. I stuck with the same polish.

6. With and orange nail polish and a dotter, create dots on the rest of your nail wherever you want and also apply the orange nail polish on the inside of the leaf in between the small vein marks.

7. Seal in the design with a clear top coat (Florelle Glossy Top & UV Protection) and you're done!


Blogger Templates
Blogger Templates