Image Slider

Showing posts with label china glaze. Show all posts

October Collective Haul

October is my birthday month so I went a little crazy with shopping especially on the day itself where I spent the morning at Sliema with two good friends and colleagues. I also went a little crazy with polishes...I can't remember the last time I bought so much polish in one go! Anywho, here's what went down this month in clothes and cosmetics :)

I'm going to start with the bargain of the month which is none other than this leather clutch bag from Topshop which was on sale for €18.25 instead of €61. It is quite roomy and the leather feels like its good quality.


Sweater weather is finally here and I have bought this green cardigan from Mango for €22.99 and this chunky knit from Stradivarius for €27.99. I have already worn the cardigan and it's so comfy I might get the other colours too and I really can't wait to wear the knit sweater :)


Zara had this cute skirt for €29.99 which I am already thinking of different ways to style it and they also had this red jacket which I wanted one like for ages. It was a little on the pricey side at €89.95 but the material is of very good quality and I still have Zara jackets from like 8 years ago or so and they still look like new. The Bardot top is from River Island and it cost €33. 


As if the above clothes were not enough, I treated myself to an official birthday present...two Fossil bracelets with rose gold elements. The curb chain one cost €39 while the leather one cost €49.


Moving on to nail polish, I bought two China Glaze shades (Lug Your Designer Luggage and Choo-Choo Choose You) from The Giver Autumn 2014 Collection for €12 for both, Zoya Pixie Dust Lux and Zoya Tinsley for €14.62 for both as well as Sally Hansen Complete Salon Manicure 320 Raisin The Bar (€7.99) and Insta-Dri Top Coat (€7.40).


I have caved in and bought four shades of Picture Polish too. they came a little expensive at €55.70 with shipping but they are truly amazingly beautiful shades and the first impressions are very good. I will do a full blog post about my experience with the brand in due course as well.


Lastly, I just have to share the birthday gift my boyfriend gave me...a Swarovski elements jewellery set and a Morellato pearl bracelet that complement a lot of outfits :)


June Collective Haul

Half the year is officially over. I honestly don't know how to feel about it all - part of me is glad that a jam-packed summer is here, part of me is also happy as when time flies it means you're having fun and a little part of me is sad that good times roll by so fast. So what do I do to avoid myself overthinking this dilemma? Shop of course! Here are all the pretty things I made mine over June.
 
Starting with cosmetics, I have bought quite a few polishes to add to my ever-growing collection. I bought China Glaze I Sea The Point and Angel Wings from a seller on Ebay for around €6 per polish as well as this gorgeous pink from Max Factor for €7.50 in the shade 104 Just Cheerful.

 
I have also added two new polishes from Essence to my collection, namely the shades 03 Glitz & Glam and 169 A Hint Of Love. These were €2.10 and €1.70 respectively. On my search for a good top coat, I have bought Sally Hansen No Chip Top Coat for €7.40.

 
To remain on the theme of nails, I have placed a small order on Born Pretty Store and I ended up getting the following items for just €20! So I got this cute small display book to store image plates in, a snowflake image plate (I know it's totally out of season but it's cute I couldn't resist!), shell decorations and two varieties of water decals.
 
 
Browsing the makeup stands at the hospital convenience shop really isn't making my wallet happy...the other day I caved and bought this gorgeous lippy from Max Factor in the shade 655 Lilac Wine. I wore it to a wedding I had last Saturday and boy I was impressed with the pigmentation and lasting power. I only reapplied out of habit, not because there was much need! This cost €13 but you really get what you pay for.

 
The last beauty-related purchases for this month are all courtesy of The Body Shop. I have some weekend breaks coming up soon and I decided to stock up on their travel-sized products while they were on offer for Buy 2 Get 1 Free. I bought the Mango Body Butter, Mango Body Scrub (€4.50 each), Mango Shower Gel (free), Rainforest Balance Shampoo, Rainforest Balance Conditioner (€3.95 each), Vanilla Bliss Body Polish (free). I also bought the Peppermint Foot Spray and Peppermint Reviving Leg Gel for €6 and €6.30 respectively.


Moving on to clothes, Mango has been quite a winning choice this month. I love the quality of their clothes and their fit and I just can't help not to shop each time I go into the store. I know it's still very early to start thinking about winter but I just couldn't resist this greyish white coat which was the very last one in my size. I paid €89.99 for it. Next is this gorgeous pair of super skinny super white trousers which I bought for €39.99. The fit is superb and I already have a good number of outfits planned around it.

 
More trousers from Mango...this time it's this black tailored pair that also came with a belt - a bargain for €29.99 if you ask me and again, the fit is excellent. My favourite pair is this printed relaxed one. I have been obsessed with anything blue lately and I couldn't leave this pair in the store. It cost €39.99.


The last purchase of the month are these flat slingbacks from Debenhams. They were only €26 and the holographic gold colour is what sold me. I tend to favour gold over silver so I am sure I will get a lot of wear out of these.


NOTW | Pastels and Gold

Good morning lovelies :) With Spring in full bloom, I have finally got the chance to wear pastel nail polish again. I went for some subtle sponging nail art on my ring fingers and I feel this manicure has a vintage feel to it. Read on to see how it easy it is to re-create!
 
 
1. Prep nails with a base coat and allow to dry.
 
2. Start painting your nails in the colour palette of your choice. I have used E.L.F. Lilac on my pinky and index, Essence Colour & Go 110 Modern Romance on my middle, Sally Hansen Xtreme Wear 300 White On on my ring fingers and China Glaze Midnight Kiss on my thumbs. Allow to dry completely and follow with a second coat.
 
3. Apply a little gold nail polish on a makeup sponge and gently dab it on the ring fingers. Repeat for as many times as you like to obtain the opacity you want. Repeat this step with the lilac and peach polishes in random places on the nail. The aim is to merge the colours together yet each of them would still be distinguished.
 
4. Once dry, apply a top coat to preserve your design.

 
P.S. I have submitted this manicure as part of a blog contest on the Julep website. Julep is a beauty company, well known for their nail polishes which I have heard a great deal of good things about. Too bad they don't deliver to Malta :( Anyway, if you are interested in checking out their selection, you can do so through this link here: http://www.julep.com/shop/nail-polish.html

NOTW | Pink Flowers for the Birthday Girl

Hey all :) I am posting this week's nail art tutorial quite late because I was working all day today. So tomorrow is my birthday and I wanted a special manicure that totally agrees with my personality. I chose to have a deep French manicure (always elegant) and I opted for a combination of pink (very girly) and black (timeless and goes with everything). It took me some time to complete but in the end, the results were well worth it for I really like how it turned out and I got a lot of compliments for it.

 
Here is the step-by-step tutorial!
 
1. Prep nails with a base coat and proceed to apply a deep welled French tip with black polish. I used Orly Gel FX Liquid Vinyl so I had to cure it under UV light. The French tip should cover up to half of your nail tip.
 
2. When dry, apply a light pink polish to the clear part of the tip so that your French manicure looks like the ones in the photos. I used Orly Gel FX Catch The Bouquet.
 
3. Subsequently, apply an iridescent glitter polish over the pink part. I used Essence Colour and Go 105 Party Princess.
 
4. Define the pink-black borders with a pink crème polish such as China Glaze Second Hand Silk and apply a pink rhinestone in the spot where the borders intersect.
 
5. With the same pink crème polish, paint little flower petals around the rhinestone on the ring fingers on the black part only.
 
6. Apply top coat to seal in your design and you're done :)


Nail Polish Collection | China Glaze

Continuing from my nail polish storage post, today I will start showing you my nail polish collection. I have categorized the polishes by brand and first up is China Glaze. I've been hooked on China Glaze nail polishes ever since I bought the first one, Awakening over two years ago. Most of the formulas are very easy to work with and I think China Glaze is always on the forefront of new trends as far as nails are concerned. These are all my China Glaze polishes: (polish descriptions and swatches all from left to right)


Westside Warrior (Metro Downtown - Fall 2011) - hunter green crème
Trendsetter (Metro Downtown - Fall 2011) - true mustard with a green undertone and tiny gold flakes
Traffic Jam (Metro Uptown - Fall 2011) - bright raspberry crème
Jungle Queen (On Safari - Fall 2012) - dark greyish purple with a lighter purple shimmer running through. A possible dupe to Chanel Paradoxal
Kalahari Kiss (On Safari - Fall 2012) - light mustard crème
Sunset Sail (Anchors Away - Spring 2011) - nude peach with tiny pearlescent flakes
Sea Spray (Anchors Away - Spring 2011) - baby blue crème with a grey undertone
For Audrey (Something Blue 2007) - Tiffany blue crème


Flip Flop Fantasy (Poolside - Spring/Summer 2010) - neon coral crème
Lemon Fizz (Up & Away - Spring 2010) - pastel yellow crème
Second Hand Silk (Immaterial Gurl - Summer 2008) - baby pink crème
Awakening (Urban Chic - 2005) - purple/pink duo-chrome with bronze shimmer all throughout
Princess Grace (Monte Carlo) - soft lilac pearl
Not In This Galaxy (Holographic - 2013) - rosy pink with a red undertone. Holographic reflects visible from certain angles
Ring In The Red (Let It Snow - Holiday 2011) - medium round and fine red glitters suspended in a transparent red jelly base
Snowglobe (Let It Snow - Holiday 2011) - large and smaller iridescent hex glitters in a transparent jelly base
Lubu Heels (The Perfect Pair) - fine red glitter suspended in black jelly base


Midnight Kiss (Holiday 2010) - gold foil
Get Carried Away (Cirque Du Soleil Worlds Away - December 2012) - a mix large silver and red hex glitters plus small black and silver glitters and black bar glitter in a black jelly base
It's A Trap-Eze (Cirque Du Soleil Worlds Away - December 2012) - large multi-coloured hex glitters and small multi-coloured round glitters in a milky white base
Crackle Glaze Broken Hearted (Crackle Glaze - Spring 2011) - shocking pink crackle effect polish

Do we have any China Glaze colours in common? Any other shades you recommend?

NOTD | La Ville Des Lumieres

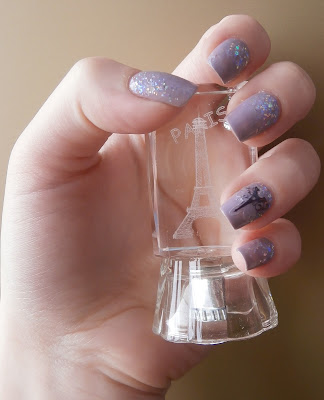
Good afternoon everyone :) This week I was looking through some pictures and I came across the ones from my last visit to Paris and since I have recently bought a pack of Eiffel Tower nail decals, I thought I should create some nail art with them.

When I think of Paris, a million adjectives cross my mind, especially the city's 'nickname' la ville des lumieres (city of lights) and I came up with this manicure. Read on to learn how to achieve the same look!
 

1. Apply a base coat to protect the nails.

2. Follow with two coats of a dark lilac polish. I used Essence Colour & Go 131 Ballerina's Charm.

3. When dry, apply a glitter polish such as China Glaze Snowglobe to the base of each nail. Start by dabbing the glitter onto the nail and gently drag it up towards the centre to achieve a gradient look. Allow to dry.

4. When dry, pick a sticker the size of your nail and affix it in the centre of the nail, a little above the base to give the illusion of lights behind the Eiffel Tower.

5. Seal with a top coat for a longer lasting manicure.


NOTW | Spring Blooms

The weather this week kept me in a spring mood and I opted for a floral manicure again. This time I tried the two accent nails look and I used three base colours.  Follow the simple steps to a little garden on your finger tips!


1. Prep nails with a base coat and leave to dry completely.
 
2. As base colours, I used Wjcon Nail Lacquer N.702 for the thumbs and index fingers, Essence Tip Painter for the middle and ring fingers and Essence Colour & Go 128 Let's Get Lost (mixed in a 1:2 ratio with the white nail polish) for the pinky fingers. Leave to dry thoroughly.
 
3. For the flowers, use a medium sized dotting tool to create 5 petalled flowers or 3 petalled flowers in the corners of the nails. Drag the centres of each petal toward the centre of the flower with a small dotting tool. For the flowers, I used China Glaze Lemon Fizz, Wjcon Nail Lacquer N.702 and Essence Colour & Go 128 Let's Get Lost.
 
4. Apply a dot of silver foil polish in the centre of each flower and leave to dry. Here, I used Orly Dazzle.
 
5. Seal everything with a top coat and you're done!


NOTW: Pink Ombre

I have finally found some time to try ombre nails! I chose pink as I think it is a colour that's easy to work with to create the desired effect and I found that the easiest way to create a nice gradient from one nail to the next is to pick two shades of the same colour, not more than 5 shades apart and mix them in different proportions to obtain the in-between hues. Here's how I did mine:
 
 
1. Prep nails with a base coat to protect your nails.
 
2. Pick two shades of the same colour and mix the colours together as follows on a piece of plastic. I chose China Glaze Second Hand Silk and Essence Colour & Go 107 Naughty but Pink.
 
- Pinky: Naughty but Pink
- Ring Finger: 2 drops Naughty but Pink + 1 drop Second Hand Silk
- Middle Finger: 2 drops Naughty but Pink + 2 drops Second Hand Silk
- Index Finger: 1 drop Naughty but Pink + 2 drops Second Hand Silk
- Thumb: Second Hand Silk
 
Apply two coats of each.
 
3. You can either stop there and top coat the nails or else, you can opt for a little extra on the ring finger like I did. I used yellow fimo flowers for contrast and affixed a whole one at the side, followed by a two petalled one and just one petal on the other side as shown in the pictures.
 
4. Seal all nails with top coat and you're done!