Image Slider

Showing posts with label neon. Show all posts

Salvaged Beginnings | Parascandalo's latest collection

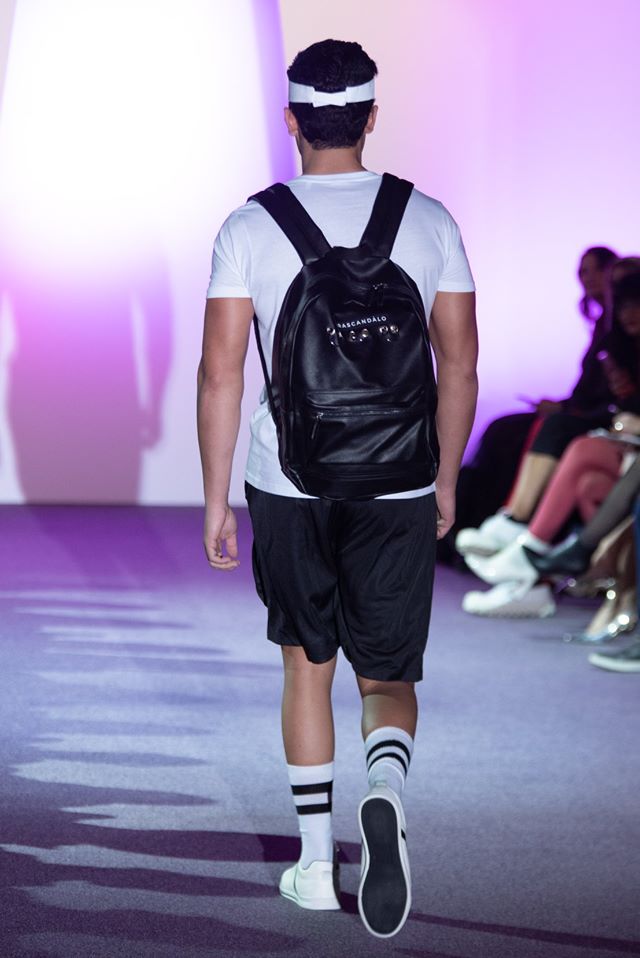
Even though winter has started to show its gloomy, cold, rainy self, the fashion industry is already in a more joyous state with Spring/Summer 2020 collections gradually being launched. The local fashion scene is no exception and last Friday I had the pleasure of attending Parascandalo’s fashion show entitled Salvaged Beginnings.

Hosted at the MCAST Paola campus, of which the designer himself is an alumnus, the collection draws inspiration from Marco Parascandalo’s hometown of Birgu and aims at reinventing the classics in his own, signature way.


The collection features a monochromatic colour palette with adventurous and strong accents of neon green and purple for the more casual pairings such as hoodies, mini skirts and sportswear. I was surprised to see more elegant pieces from Parascandalo and of course, they were my favourites. I especially loved the two-piece ensemble with the long skirt which I think of it as a modern re-interpretation of the evening gown. I love the way the fabric flows and the metallic accents which add allure to the whole look.


Other favourite pieces were the checkerboard skirts which I can see myself styling very easily and I was happy to see the iconic and much loved ‘faqa' OĦT’ logo make a comeback. Well done Parascandalo for putting together this collection!


Shoes for this show were from ALDO Shoes and sunglasses from Sunglass+Sunglass.
Hair was done by Lee Grixti from Lee's Hairstylist and his assistants and makeup by Elaine Galea and Jean Zammit. 
Catwalk photography by Mark Soler 

Cassandra Spiteri presenting the show, wearing Parascandalo - photo by Justin Ciappara

My outfit for the show, wearing Parascandalo

photo by Justin Ciappara

NOTW | Aztec and Neon

This week I finally had the chance to try on some Aztec inspired nails and I wanted to use the neon stud rhinestones I recently got from Born Pretty Store as well so I incorporated both in this fun manicure. Read on for the tutorial and more pictures :)
 
1. Prep nails with a base coat and follow with two coats of a neutral polish. Used here is Essence Soul Sista Trend Edition Nail Polish 04 Totally Retro Nude. Allow to dry completely.
2. For the black stripes and Aztec patterns, I used black acrylic paint diluted with water to enable me to draw the intricate lines flawlessly. I used a size 0 Kolinsky brush as I find they give better results than synthetic hair brushes.
For the ring fingers, start by drawing two thin lines in a 'v' shape and then proceed to draw the Aztec stair-like design in small lines first and subsequently fill in. It helps to draw another 'v' shape a little further up to serve as an outline. Finish by painting a small triangle at the very tip as shown in the pictures and add neon rhinestones at the base of the nail.
 
3. For the middle fingers, you can use striping tape for more defined lines, otherwise you can just use a black nail polish straight from the brush and create a thick vertical stripe right up the middle of the nail. I used Essie Licorice for this step.
4. While the black polish is still wet, adhere square and round rhinestones to your liking and leave to dry.
5. Seal all the nails with top coat and you're done!


Review: Born Pretty Store Neon Nail Polish in #18

Neon hues are all the rage this summer and while neon clothes and accessories might not be everyone's cup of tea, neon nail polish and nail art is a cheap and easy way to stay on trend without moving out of your comfort zone! Enter the new nail polishes from Born Pretty Store which also glow under UV light! 

I was sent one of the 24 shades available and since I was able to, I chose number 18 as it is a nice bright melon pink, perfect for summer time! 

The bottle is pretty standard and holds 15ml of product.  The brush is very nice and easy to work with as you get your nails done in a few strokes.  The formula is on the thick side and is fully opaque in two coats.  As with most neon nail polishes, this one dries to a rather matte finish but you can always apply a glossy top coat if you want a glossy finish.  Two things which I am not very fond of are the drying time (it does take some time for the polish to be fully dry) and the smell of the polish (it has quite a powerful smell which fades away when the polish is fully dry. However, I recommend working with this polish in a well ventilated area).


Now for the fun part! Here are swatches, manicure ideas and pictures of how this polish would look under UV lights at the disco ;) You can check out the nail art tutorials here.


I totally recommend this nail polish for fun loving nail art enthusiasts and it retails for $4.99 (which you can get 10% off when using the code EBABK31 at checkout). You can get yours here.

PR Sample

NOTW: Neon Disco Ball & Leopard Print

This week, I have been experimenting with a neon nail polish from Born Pretty Store which I will review later on. I came up with two manicures in one week and I wanted to share them with you starting with the easier one first... Neon Leopard Print.


1. Prep nails with a base coat and when dry, sponge some white nail polish over the tips to create a French manicure.

2. Choose three neon coloured nail polishes and put some dots randomly on one side of each of the nails and leave to dry.

3. With a small dotting tool, put jagged 'C' and 'U' shapes around the coloured dots to create the leopard dots and once dry seal with a clear top coat.

The next nail art design is actually inspired by a disco ball and I did the 'disco ball' on the ring finger and the lights that reflect off it are on them remaining nails.


1. Prep nails with a base coat and when dry, paint on two coats of a shimmery silver polish on the ring fingers and two coats of the neon pink polish on the remaining nails.

2. Whilst the silver polish is still wet, place silver and pink hexagon flitters randomly all over the nail to give the impression of a disco ball. Seal with a top coat.

3. When the pink neon polish has totally dried, place striping tape in random angles. I recommend using 3 to 4 stripes. 

4. Paint black nail polish over these nails (including the tapes) and after around 20 seconds peel off the tape to reveal the pink colour underneath. Seal with a top coat and you're ready to show off your nails under disco UV lights!


I hope you enjoyed these tutorials and if you're interested in the neon polish, watch out for my review on it in the coming week!